Managing user access to a consent management platform shouldn't mean handing out yet another set of credentials. When your team grows — or when an employee leaves — manually updating logins in every tool creates real security and compliance risk. Juggling separate passwords for your privacy platform is friction your IT and compliance teams don't need.
Many organizations try to solve this with shared accounts or manual offboarding checklists, but both approaches are error-prone and fail even basic access-control audits. A proper Single Sign-On (SSO) integration is the right fix — and if your organization already uses Microsoft Entra ID (formerly Azure Active Directory), you're minutes away from a clean solution.
Secure Privacy natively supports Microsoft Entra ID SSO. Once connected, every user in your Azure AD tenant can log in to Secure Privacy with their existing Microsoft credentials — no separate password, no manual provisioning, and instant access revocation the moment you disable an account in Azure.
By the end of this guide you will have a fully working Microsoft Entra ID SSO integration with Secure Privacy: your Tenant ID, App Registration, API permissions, and client secret all wired up so your team can sign in via the Microsoft login button on their very next visit.
Who Is This Guide For?
This article is written for IT administrators and compliance managers who:
Manage their organization's Microsoft Entra ID (Azure AD) tenant
Have an active Secure Privacy account with administrator access
Want to centralize authentication so team members use their Microsoft credentials to access Secure Privacy
Prerequisites
An active Microsoft Entra ID (Azure AD) tenant
An Azure account with permission to create App Registrations and grant Admin consent (typically a Global Administrator or Application Administrator role)
An active Secure Privacy account with admin rights to access SSO settings
All Secure Privacy user email addresses must match the User Principal Name (UPN) format in your Azure tenant (no
EXTguest accounts)
Step 1 — Locate Your Tenant ID in Azure
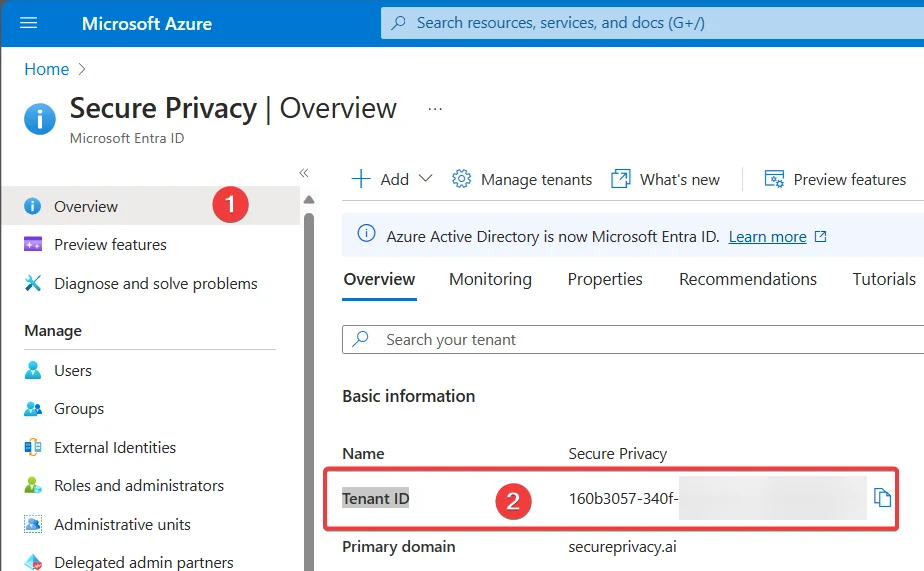
Your Tenant ID identifies your organization's Microsoft Entra ID directory. Secure Privacy needs it to know which Azure AD tenant to authenticate against.
From the Azure Home page, use the search bar to find "Microsoft Entra ID" and navigate to it.
Search for "Microsoft Entra ID" from the Azure Home page.
On the Microsoft Entra ID overview page, locate your Tenant ID and copy it.
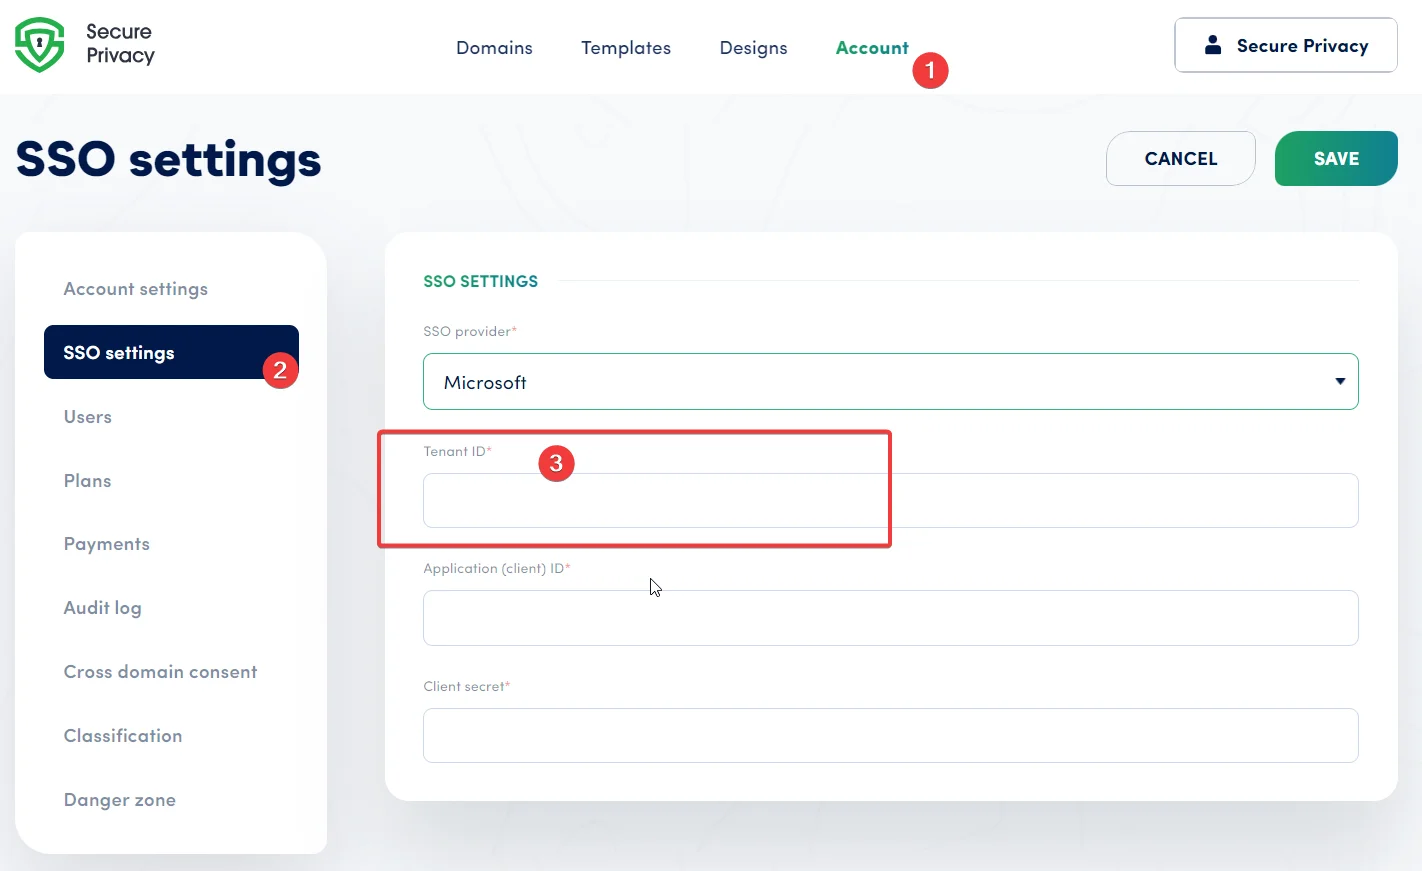
Paste the Tenant ID into the SSO settings page of your Secure Privacy account.
Copy the Tenant ID from the Microsoft Entra ID overview page.
Step 2 — Create an Enterprise App Registration in Microsoft Entra ID
An App Registration tells Azure AD that Secure Privacy is an authorized application allowed to authenticate your users.
From the Azure Home page, search for "Microsoft Entra ID", then click "Add" → "App registration."

Select "App registration" from the Add menu in Microsoft Entra ID.
In the setup wizard, enter a name for your SSO application (this can be changed later).
Select the appropriate account type as shown below:
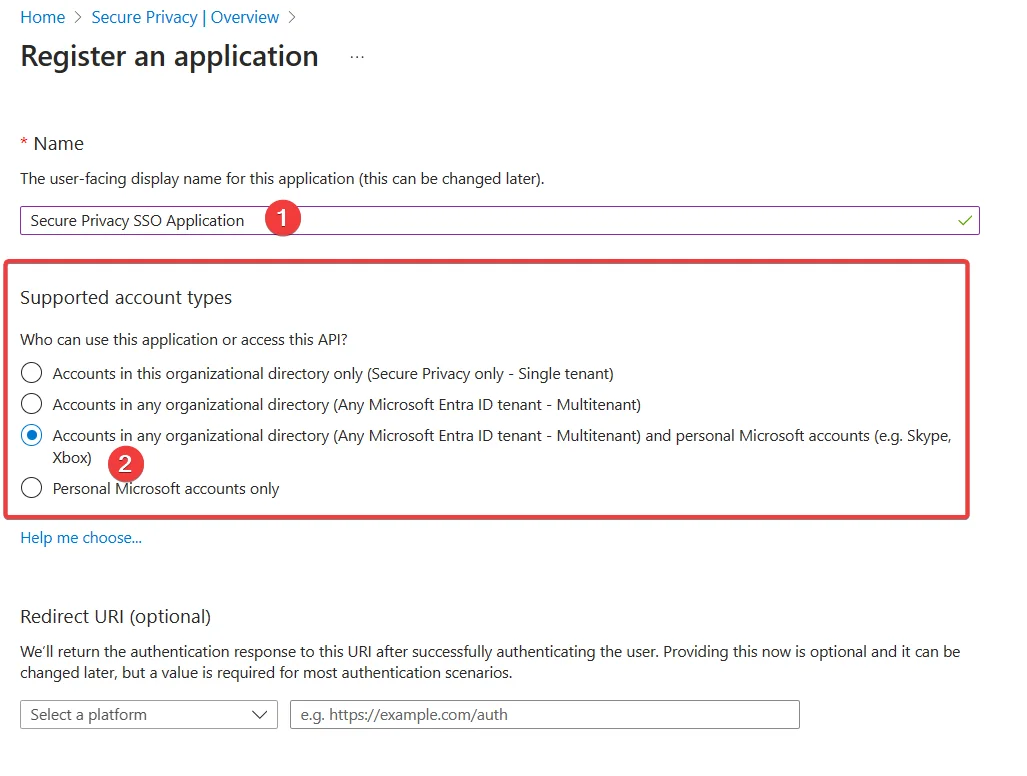
Choose the supported account type for your Secure Privacy SSO app registration.
Once created, you will be redirected to the application's overview page. Locate your Application (client) ID.
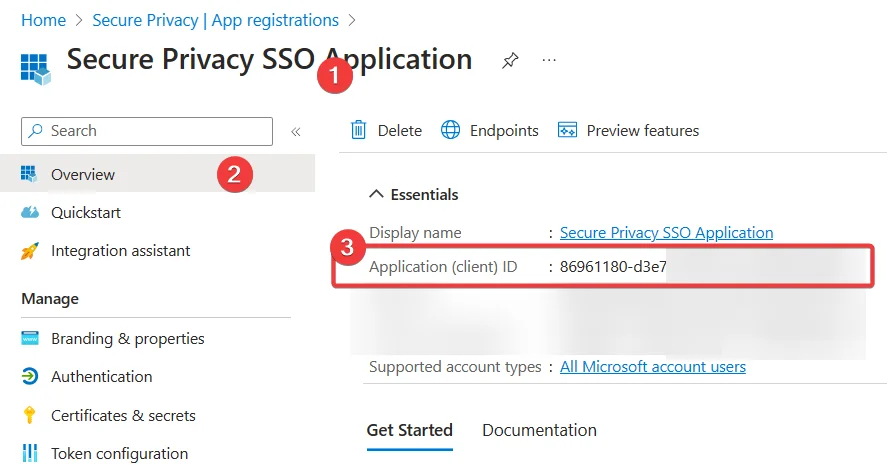
Copy the Application (client) ID from the App Registration overview.
Copy the Application (client) ID and paste it into the SSO settings page in your Secure Privacy account.
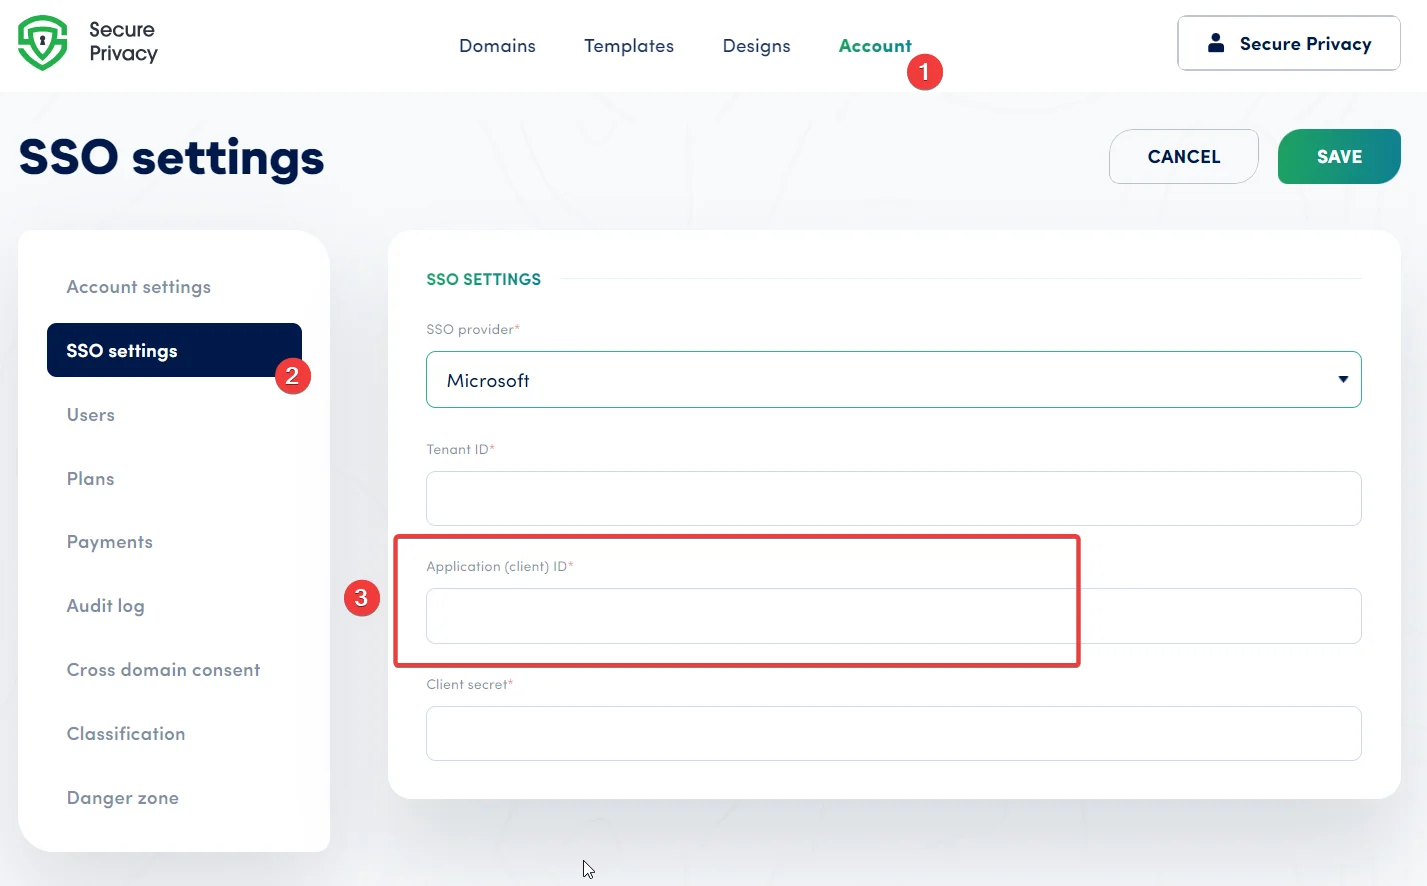
Paste the Application (client) ID into Secure Privacy's SSO settings.
Step 3 — Configure Microsoft Graph API Permissions
Secure Privacy requires specific Microsoft Graph API permissions to read user identities during the SSO login flow. This step also covers the redirect URI and email format requirements.
Grant the Required API Permissions
Navigate to the API Permissions page of your SSO application and confirm the following permissions are granted to Microsoft Graph:
Delegated permissions:
emailopenidprofile
Application permissions:
User.Read.All
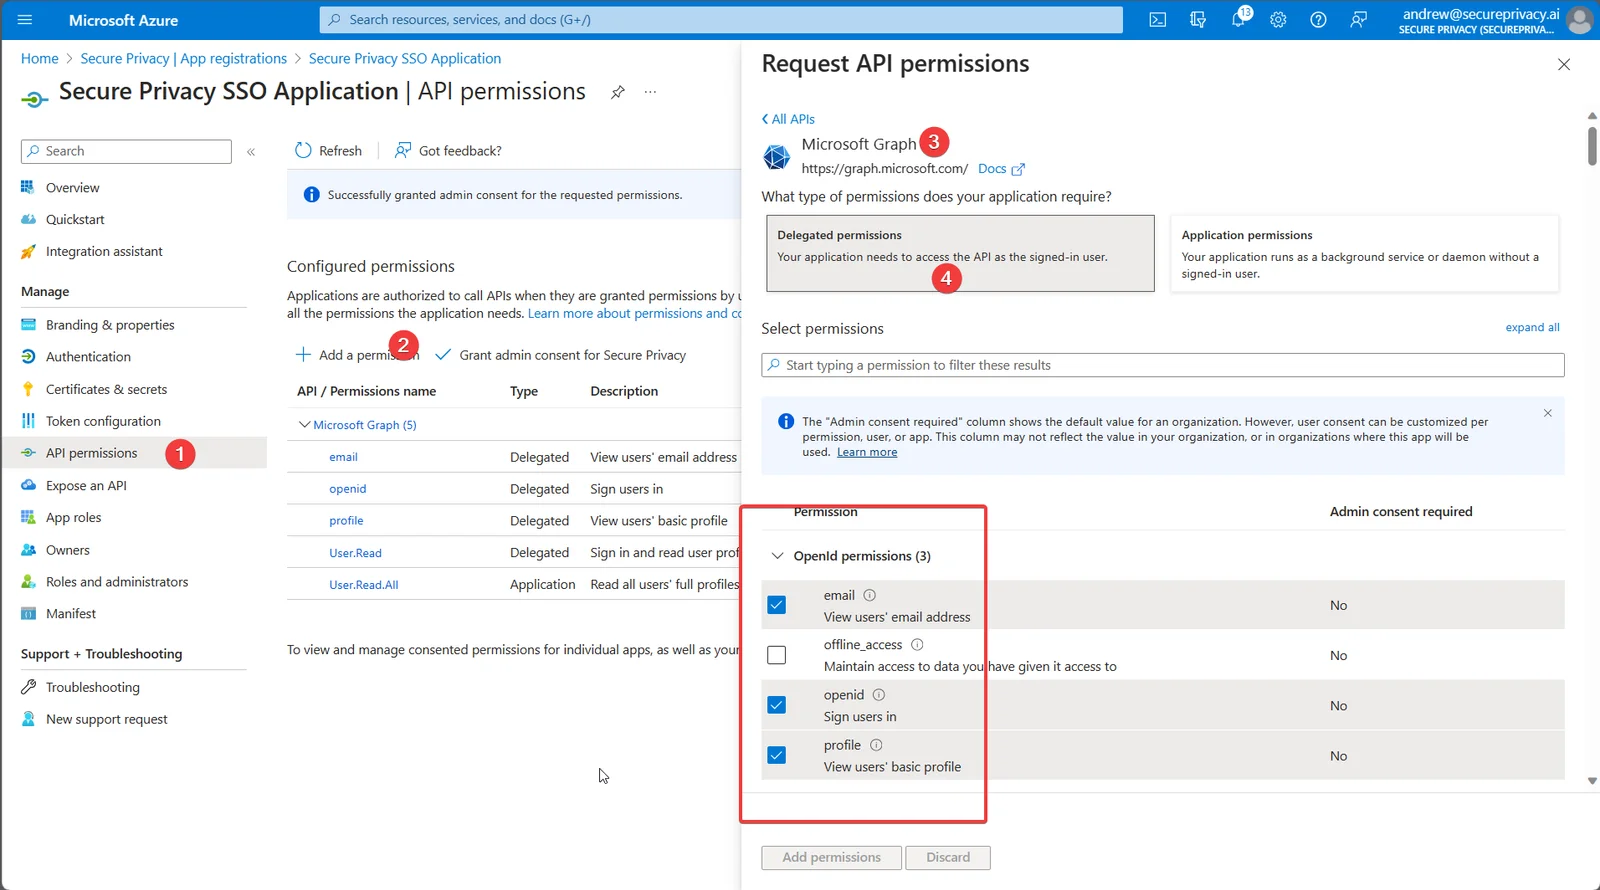
Confirm all four required Microsoft Graph API permissions are listed.
Grant Admin Consent for All Permissions
Ensure that all configured permissions have been granted with Admin consent:
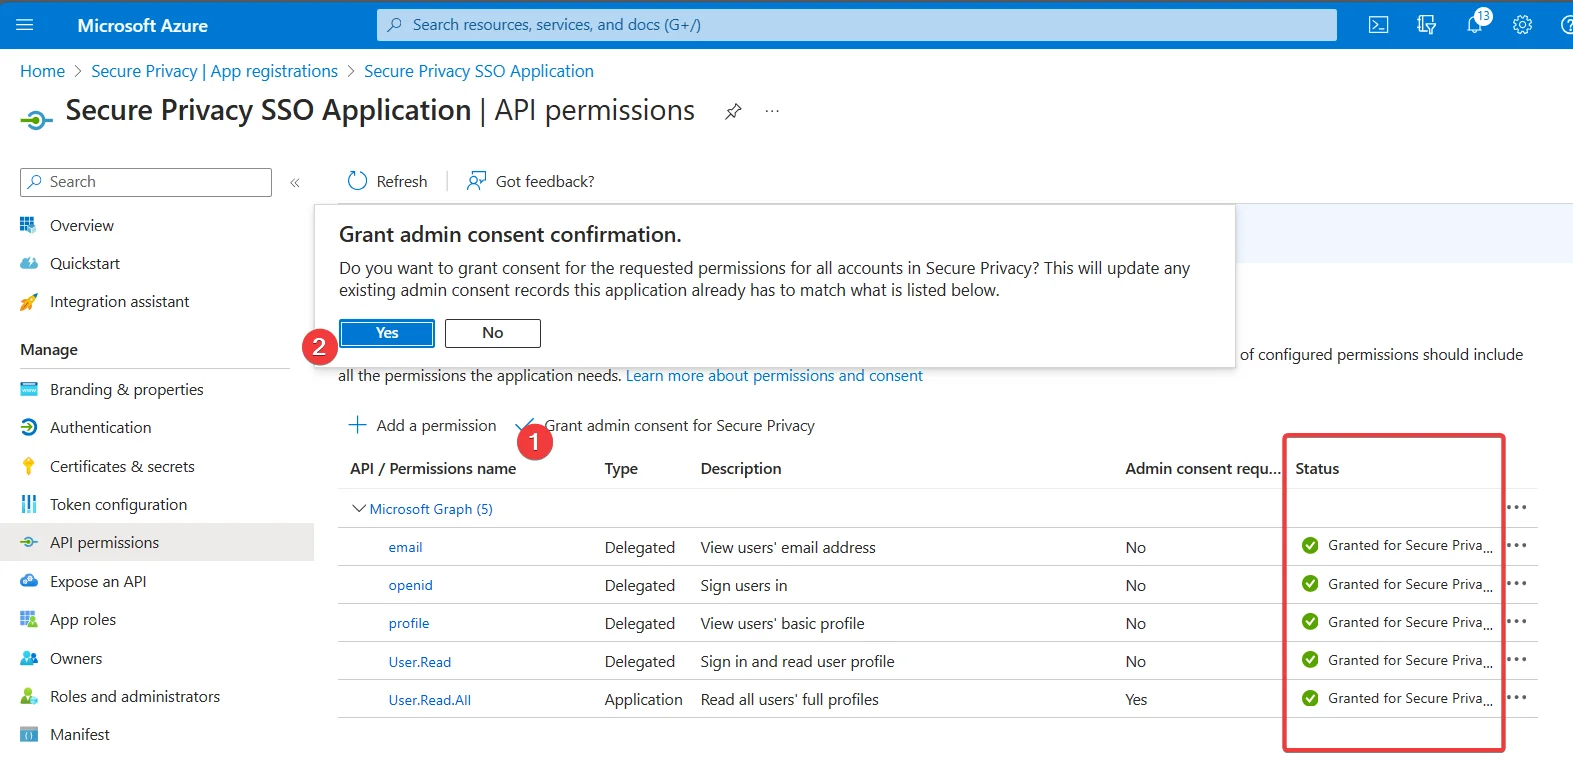
All permissions must show Admin consent granted before SSO will work.
Note: If you cannot grant Admin consent yourself, ask your organization's Global Administrator to approve the permissions.
Verify the User Principal Name (UPN) Email Format
The email address stored in Secure Privacy for each user must exactly match their User Principal Name (UPN) in Azure. This applies to the admin configuring SSO and to every user added on the Users page.
Important: Email addresses containing "EXT" (external/guest accounts) are not supported and will prevent login.
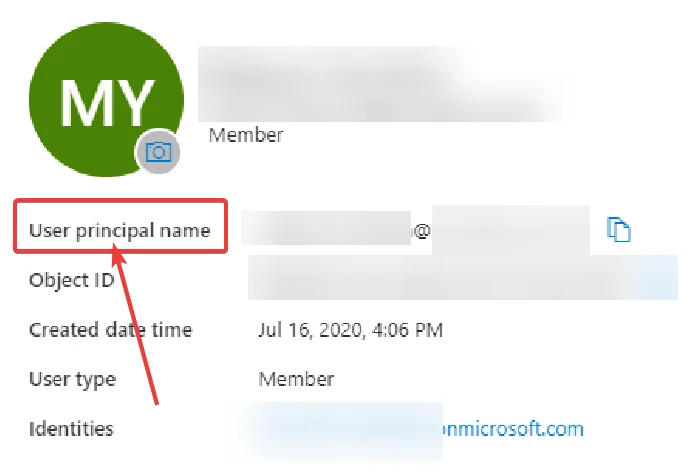
Confirm each user's UPN in Azure matches the email stored in Secure Privacy.
Set the Redirect URI on the Authentication Page
On the Authentication page of your Azure App Registration:
Select "Web" as the platform.
Add
https://cmp.secureprivacy.ai/as the Redirect URI.
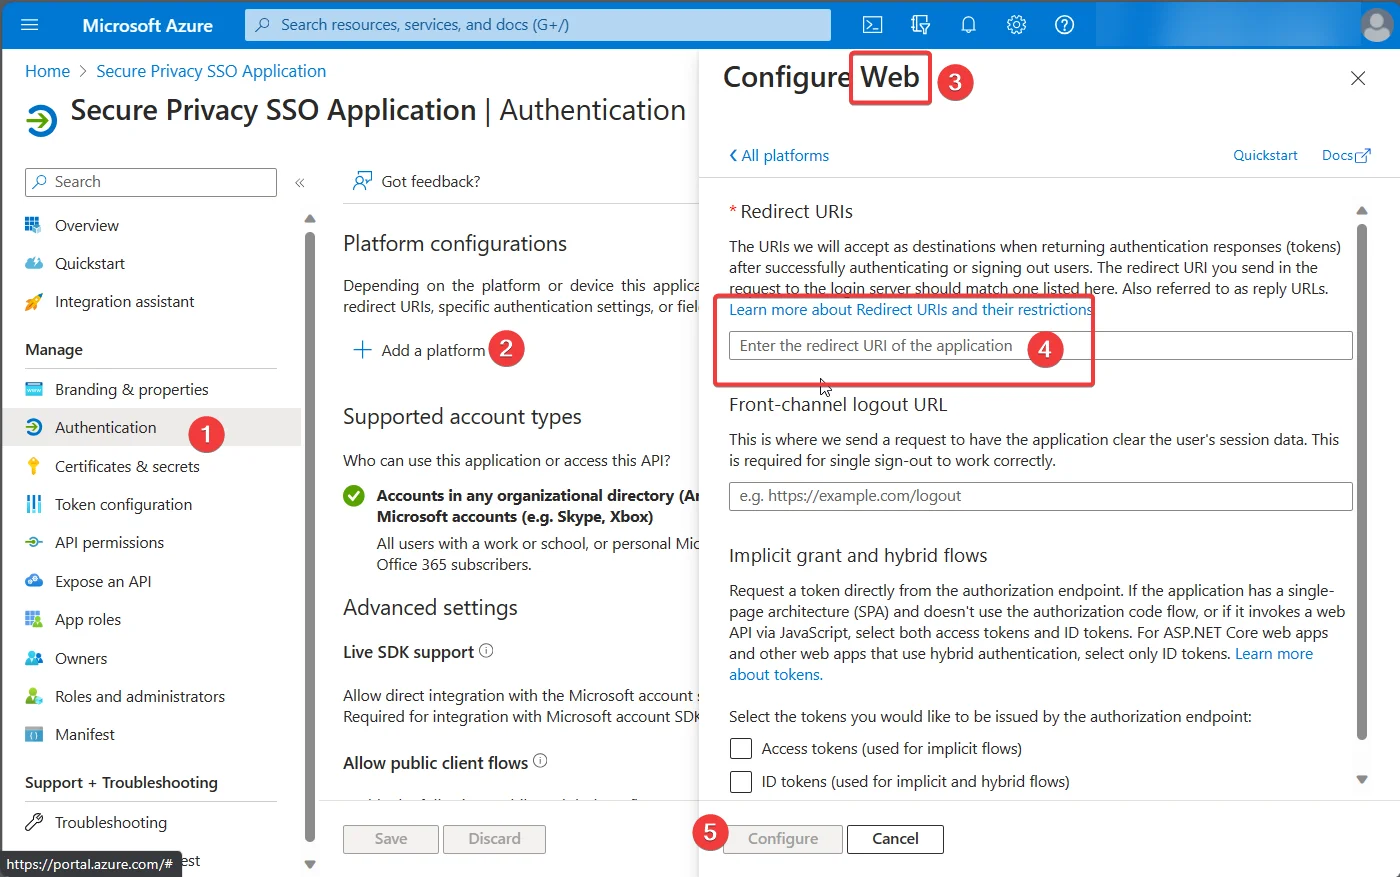
Add https://cmp.secureprivacy.ai/ as the redirect URI under the Web platform.
Step 4 — Create a Client Secret for the SSO Application
The client secret is the credential Secure Privacy uses to authenticate with your Azure App Registration. Copy it immediately — Azure only shows the value once.
In App Registrations, select your SSO application.
Navigate to "Certificates & secrets" and click "+ New client secret."
Immediately copy the "Value" of the newly created client secret — this value is only visible once.
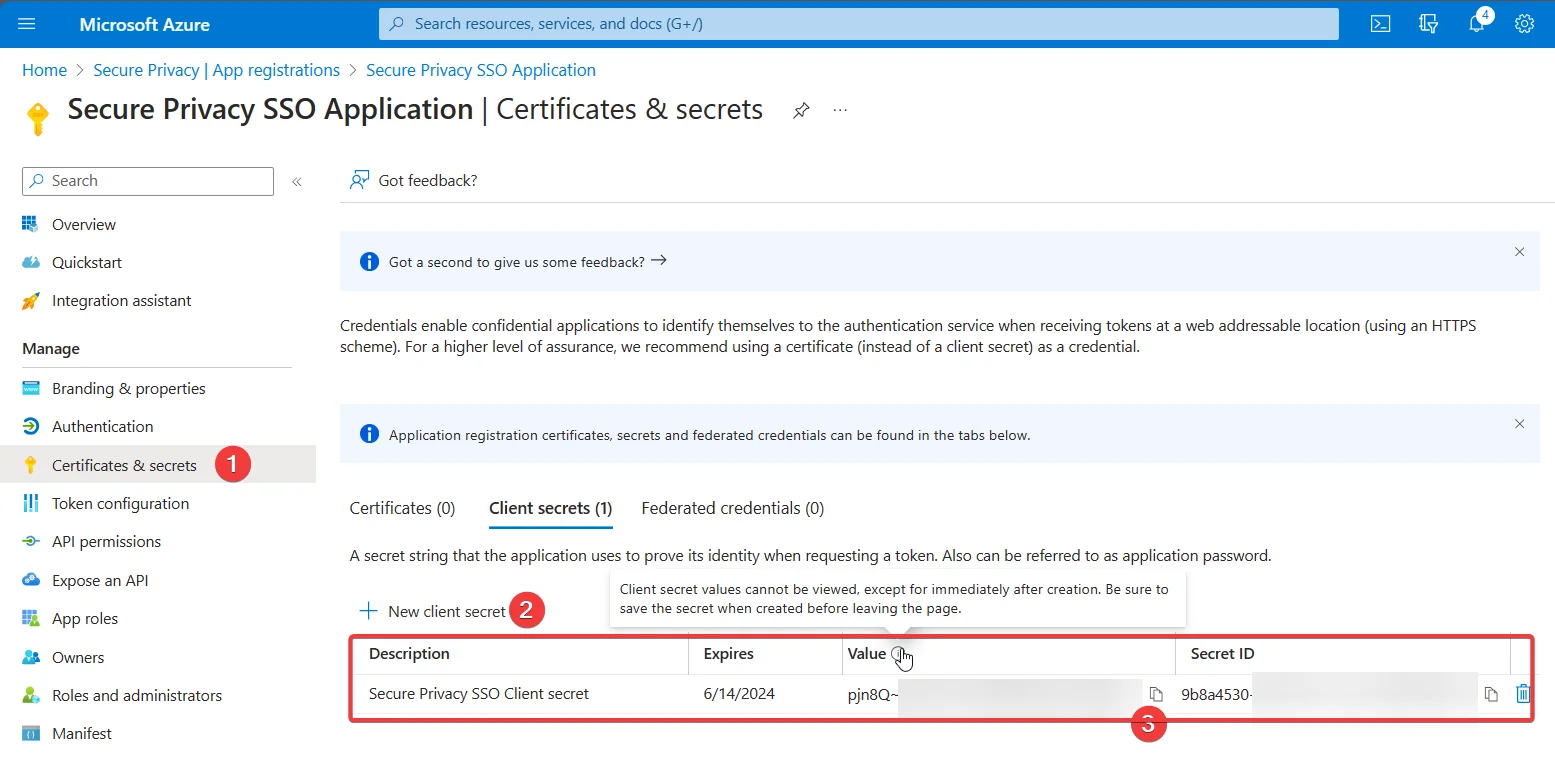
Copy the client secret Value immediately — it won't be shown again after you leave this page.
Paste the client secret value into the "Client secret" field in your Secure Privacy SSO settings.
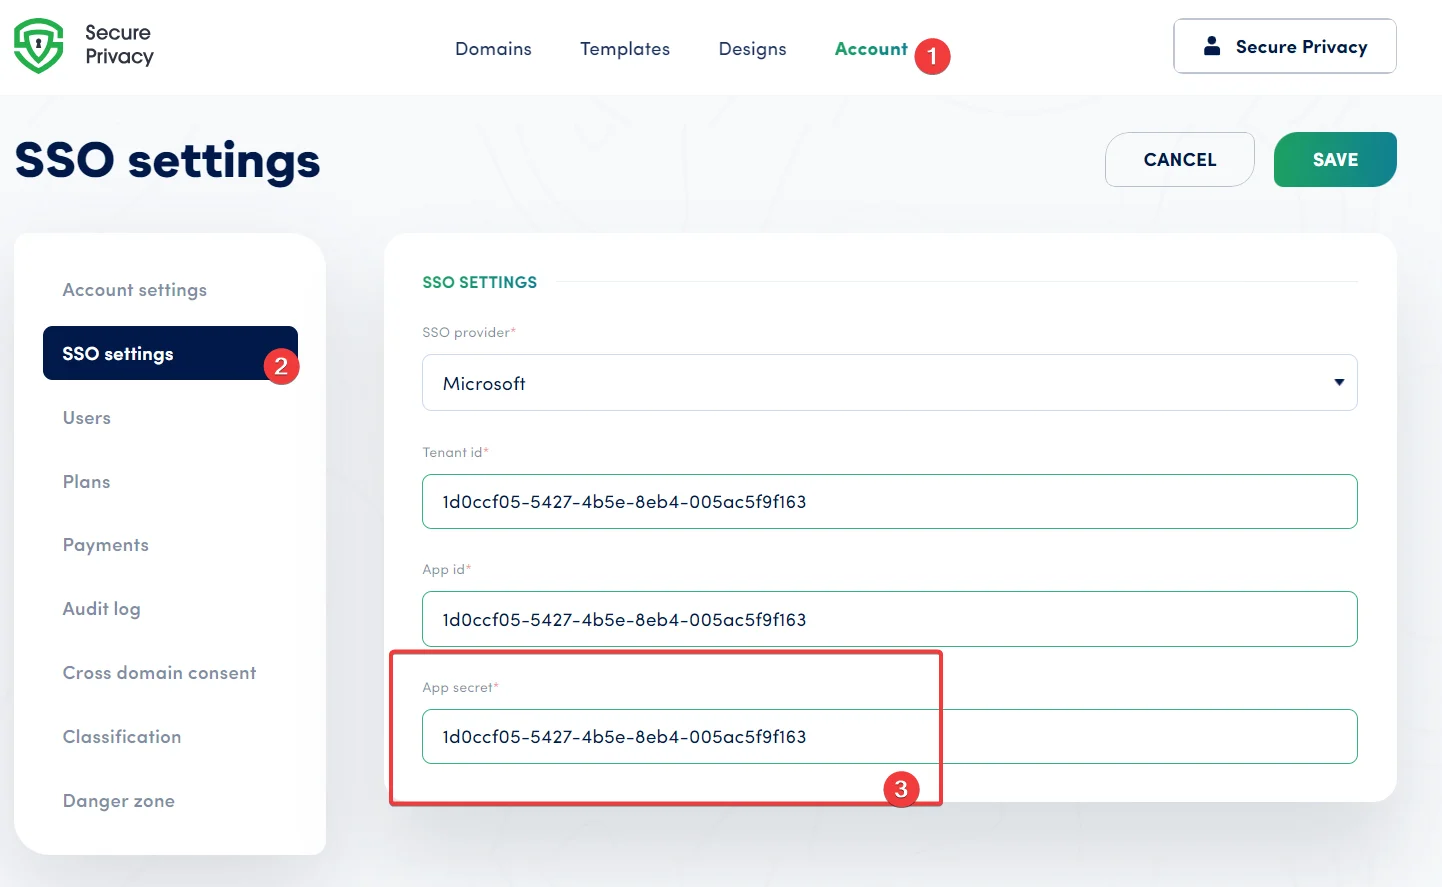
Paste the client secret value into the corresponding field in Secure Privacy's SSO settings.
Step 5 — Add Users and Enable Microsoft SSO Login in Secure Privacy
Your SSO configuration is complete. The final step is adding your Azure organization's users in Secure Privacy so they can log in with their Microsoft accounts.
Add users via the Users page in Secure Privacy, using their Azure User Principal Name as their email address:
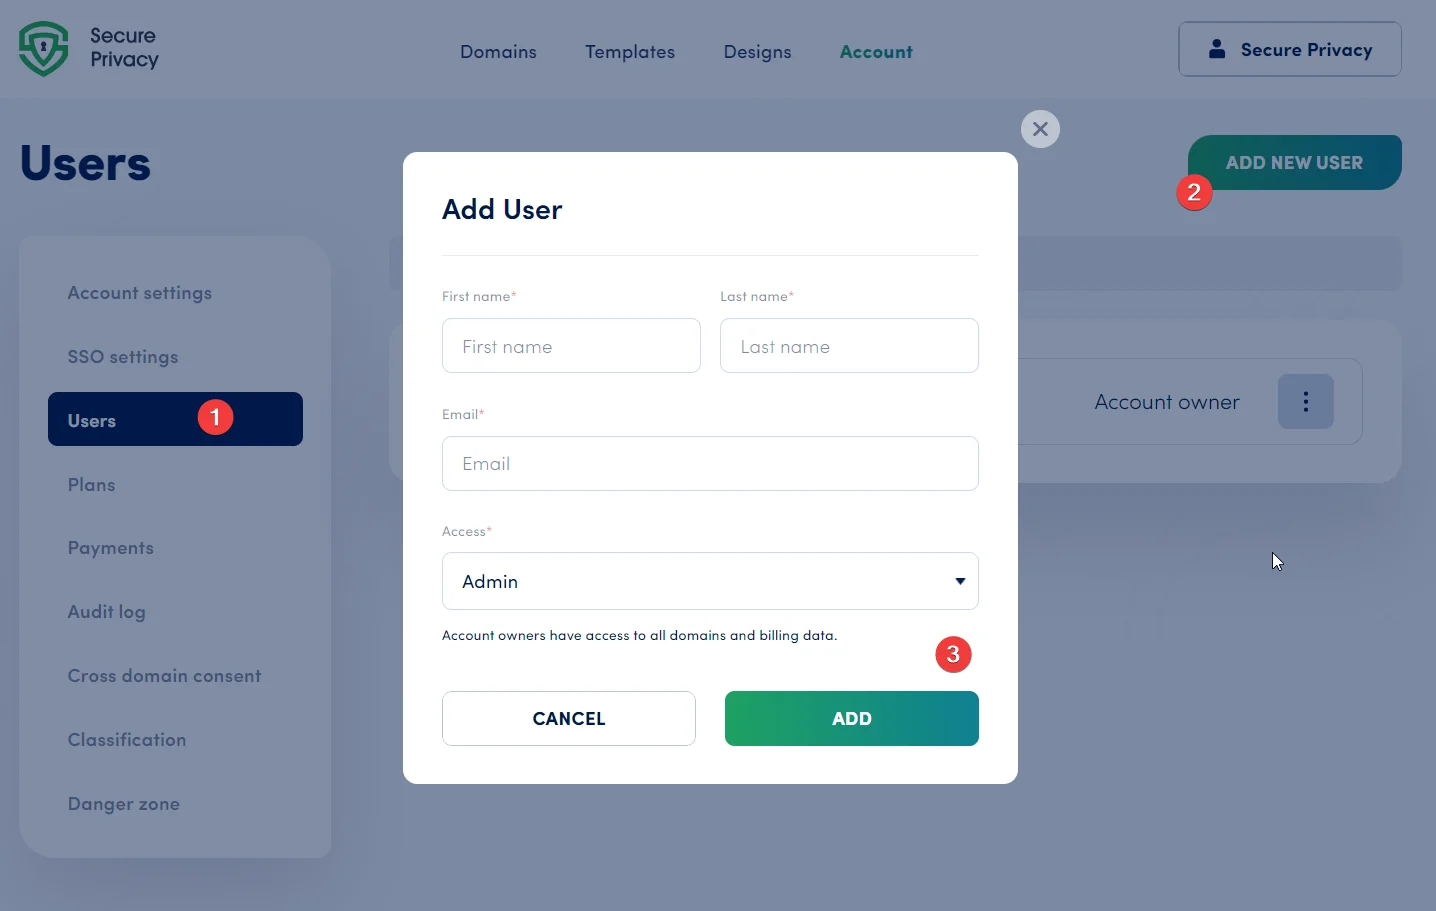
Add Azure users to Secure Privacy via the Users page using their UPN email addresses.
Once added, your Azure users can log in to Secure Privacy using their Microsoft account — no separate Secure Privacy password required.
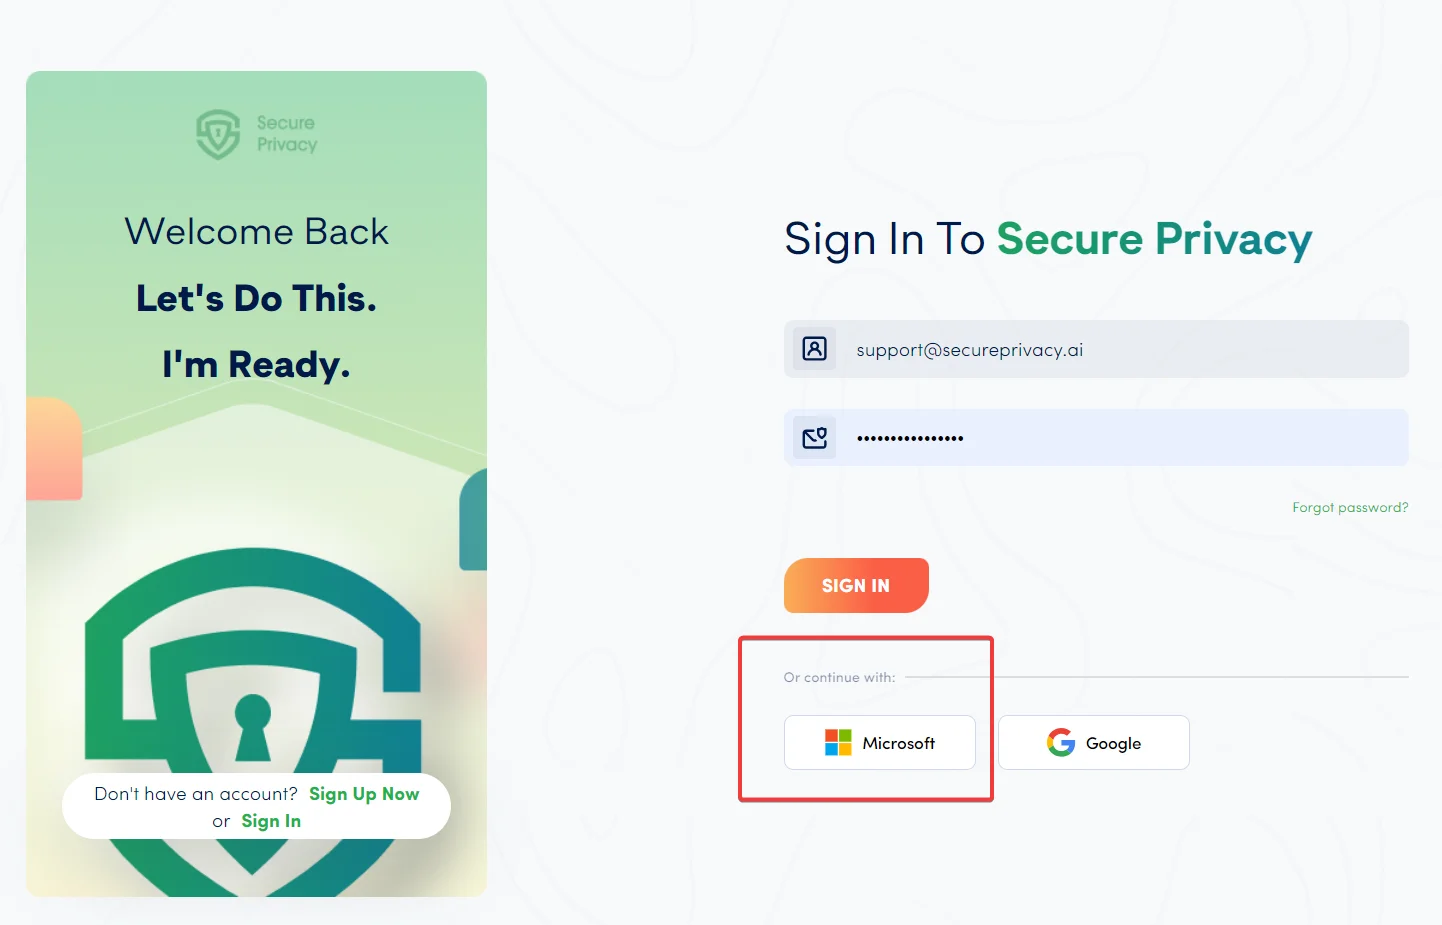
Users will see a "Sign in with Microsoft" option on the Secure Privacy login page.
What Happens After SSO Is Enabled
Once the integration is live, user access is managed entirely from your Azure tenant. Disable or remove a user in Microsoft Entra ID and their Secure Privacy access is revoked automatically on their next login attempt — no separate offboarding step required in Secure Privacy.
If your organization's SSO configuration changes (for example, a client secret expires or you rotate credentials), simply generate a new client secret in Azure and update the value in Secure Privacy's SSO settings page.
Troubleshooting Microsoft Entra ID SSO in Secure Privacy
Users receive a login error after SSO is configured
Check the following in order:
The user's email in Secure Privacy exactly matches their User Principal Name (UPN) in Azure — including letter case.
The email address does not contain
EXT. External/guest Azure accounts are not supported.All four Microsoft Graph API permissions are present and have been granted Admin consent (look for a green tick in the Azure API Permissions page).
The redirect URI
https://cmp.secureprivacy.ai/is saved on the Authentication page with Web selected as the platform.
The client secret value is no longer available
If you navigate away from the Certificates & secrets page before copying the value, the secret cannot be recovered. Delete the old secret and create a new one, then update the Client secret field in Secure Privacy's SSO settings immediately.
Admin consent cannot be granted
Only users with the Global Administrator or Privileged Role Administrator role in Azure can grant tenant-wide Admin consent. Contact your IT department or Azure tenant admin and share the API Permissions page URL with them.
Frequently Asked Questions
Does Secure Privacy support Single Sign-On (SSO)?
Yes. Secure Privacy supports SSO via Microsoft Entra ID (formerly Azure Active Directory). Once configured, your team logs in with their existing Microsoft credentials — no separate Secure Privacy password is needed.
What is Microsoft Entra ID and how is it different from Azure Active Directory?
Microsoft Entra ID is the new name for Azure Active Directory (Azure AD) following Microsoft's 2023 rebrand. The underlying identity platform and SSO integration process are identical — if your organization already has an Azure AD tenant, you already have Microsoft Entra ID.
Do I need a Global Admin to set up SSO with Microsoft Entra ID?
You need an account with permission to create App Registrations and grant tenant-wide Admin consent. If you can't grant Admin consent yourself, ask your organization's Global Administrator to approve the Microsoft Graph API permissions.
What Microsoft Graph API permissions does Secure Privacy SSO require?
Three delegated permissions — email, openid, and profile — plus one application permission: User.Read.All. All four must be granted Admin consent in the Azure portal.
What redirect URI should I use for Secure Privacy SSO?
Add https://cmp.secureprivacy.ai/ as a redirect URI on the Authentication page of your Azure App Registration, with Web selected as the platform type.
Why can't my users log in to Secure Privacy after SSO is set up?
The most common causes are a mismatch between the user's email in Secure Privacy and their Azure UPN, an email address containing EXT (guest accounts are unsupported), missing Admin consent on API permissions, or a missing redirect URI. See the Troubleshooting section above for a step-by-step resolution checklist.