This guide explains how to block cookies and trackers in Google Tag Manager (GTM) using Secure Privacy's custom consent event triggers — using Google Analytics as a working example. By attaching sp-consent custom event triggers to your GTM tags, you can ensure third-party scripts only fire after a visitor has given the appropriate consent.
Prerequisites: This guide assumes you have already created a GTM account, set up a website container, and added the GTM container snippet to your website. See Google's GTM setup guide for help. It also assumes Secure Privacy is already installed on your website. If not, see how to implement Secure Privacy with GTM before proceeding.
Who Is This For?
Developers and tag managers implementing Secure Privacy cookie blocking via Google Tag Manager
Compliance teams ensuring third-party scripts only fire after visitor consent is obtained
Website administrators using GTM to manage analytics, advertising, and tracking tags with consent controls
How to Block Cookies Using a GTM Custom Event Trigger
The following steps use Google Analytics as the example plugin. Repeat the same process for each additional plugin or service you need to block.
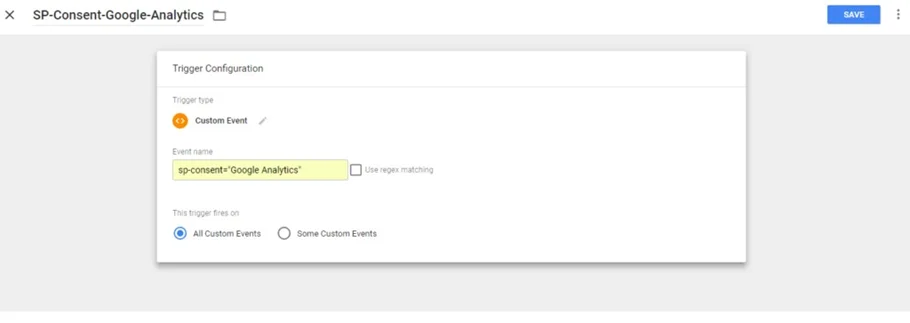
Step 1: Create a custom event trigger in GTM
In your GTM container, navigate to Triggers and click New.
Select Custom Event as the trigger type.
In the Event Name field, enter the consent event for the plugin you want to block — using the format:
sp-consent="PLUGIN NAME"The exact plugin name must match the service name shown in your Secure Privacy account under Classification in the Scan Report. For example, to block Google Analytics, enter:
sp-consent="Google Analytics"Name the trigger clearly — for example, SP-Consent-Google-Analytics — so it is easy to identify in your tag configuration.
Click Save to create the trigger.
Repeat this process for each plugin or service you need to block — creating one custom event trigger per service.
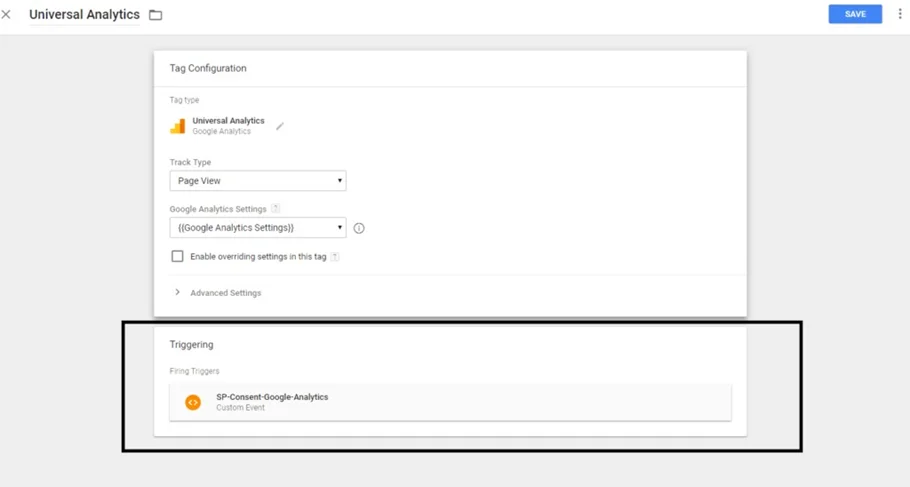
Step 2: Attach the trigger to the relevant GTM tag
In your GTM container, navigate to Tags and click New — or open your existing Google Analytics tag to edit it.
If creating a new tag, select Universal Analytics under Choose tag type.
Under Google Analytics Settings, select New Variable and enter your GA Tracking ID in the Tracking ID field.
Under Triggering, select the trigger you created in Step 1 — for example, SP-Consent-Google-Analytics.
Click Save to create or update the tag.
Step 3: Publish your GTM container
Click Submit then Publish to push your updated tag configuration live to your website.
Note: If any of your GTM tags use multiple triggers, additional configuration is needed to ensure correct consent-based blocking. See the guide on blocking cookies with multiple GTM triggers for full instructions.
Frequently Asked Questions
Where do I find the correct plugin name to use in the sp-consent event?
The plugin name must exactly match the service name shown in your Secure Privacy account under Classification in the Scan Report. Navigate to your Secure Privacy dashboard, open the Classification tab for your domain, and copy the service name exactly as it appears — including capitalization and spacing.
Do I need to create a separate trigger for every plugin I want to block?
Yes. Each plugin or service requires its own sp-consent custom event trigger in GTM — one trigger per service. Once the trigger is created, attach it to the corresponding tag in your GTM container.
What happens if I use the wrong plugin name in the event trigger?
If the plugin name in your GTM custom event trigger does not exactly match the service name in your Secure Privacy Classification tab, the consent event will not fire correctly and the tag may load without consent — creating a compliance gap. Always copy the service name directly from the Classification tab rather than typing it manually.