Summary: Want to use a specific font in your Secure Privacy cookie banner that isn't included in the default options? You can easily add a custom font to your Secure Privacy banner by importing any typeface from popular libraries like Google Fonts using a simple @import rule in the Custom CSS panel. This guide walks through every step.
Who Is This Guide For?
- Website administrators and marketers customizing the visual appearance of Secure Privacy consent banners to match their brand typography
- Developers implementing design adjustments to the banner using custom CSS
Step 1: Choose Your Custom Banner Font
Select a font: Browse and choose a typeface from a popular web font library such as Google Fonts. Look for fonts that complement your brand identity and are available in the weights you need.
Step 2: Import the Font Using @import
-
Use the
@importrule: Add the following line at the very beginning of your Custom CSS to import your chosen font:@import url('https://fonts.googleapis.com/css2?family=Your+Font+Name&display=swap'); Replace
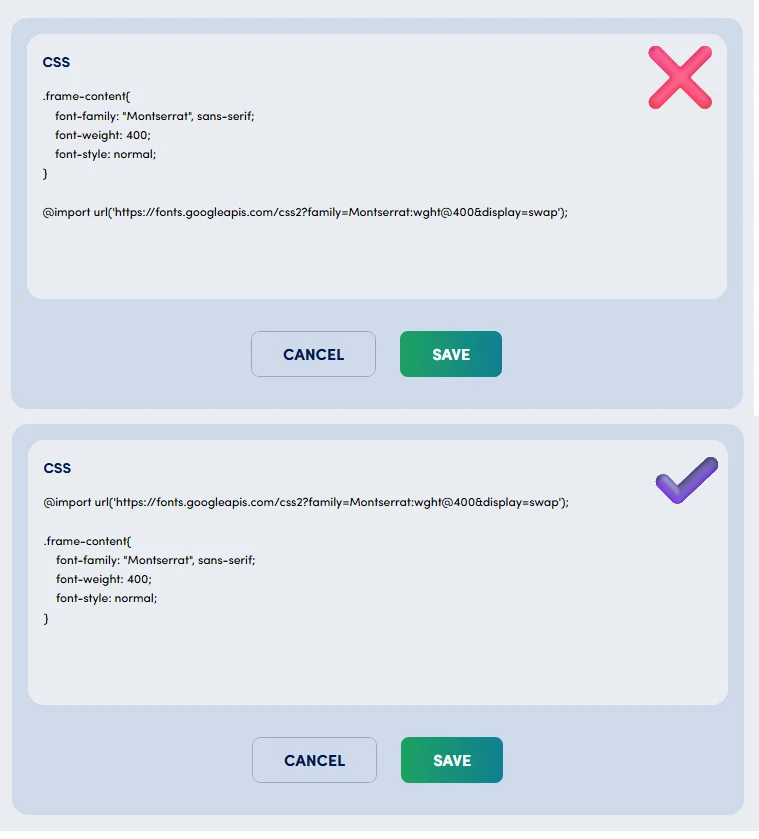
Your+Font+Namewith the actual font name from the library. For example, for Roboto:@import url('https://fonts.googleapis.com/css2?family=Roboto&display=swap');Important: Always place
@importstatements at the very start of your CSS. Placing them after other rules will prevent the font from loading correctly.
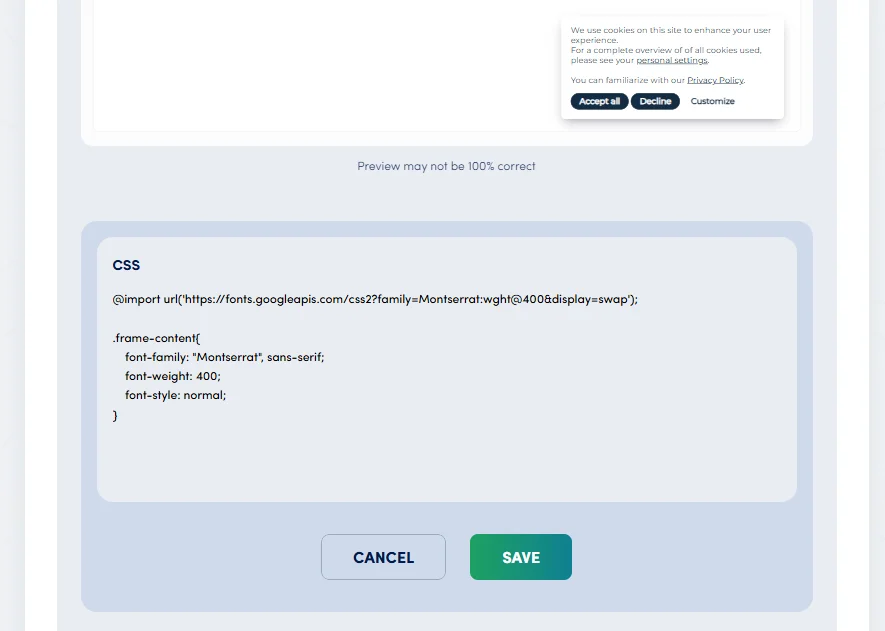
@import rule at the very top of the Custom CSS field in Secure Privacy's design editor.Step 3: Apply the Custom Font to Your Secure Privacy Banner
Use CSS selectors to target specific elements in the banner—such as headings or buttons—and apply your chosen font using the
font-familyproperty.
The following example imports Roboto from Google Fonts and applies it to the banner heading:
@import url('https://fonts.googleapis.com/css2?family=Roboto&display=swap');

.sp-banner-heading {
  font-family: 'Roboto', sans-serif;
}
This targets the .sp-banner-heading class specifically. You can apply the same pattern to other banner elements such as body text, buttons, or links using their respective selectors.
Best Practices for Custom Fonts in Cookie Banners
Test thoroughly after every change: Always verify that your custom CSS works correctly and does not interfere with banner functionality or consent button behavior.
Check the font library's documentation: Review the import instructions and usage guidelines provided by your chosen font source for any platform-specific requirements.
Load only what you need: Import only the font weights and styles you actually use. Loading unnecessary font variants increases page weight and can negatively impact Core Web Vitals scores.
Common Issues & Fixes: Custom Fonts Not Loading
-
Font not loading at all? Ensure the
@importstatement is placed at the very top of your CSS, before any other rules. Any CSS written above the@importline will cause it to fail silently. -
Custom font not applying to the banner? Double-check that your CSS selector correctly targets a Secure Privacy banner element. Use your browser's DevTools (Inspect Element) to confirm the exact class name being used by the element you want to style.
-
Performance concerns? Use only the font weights you need (e.g.,
400and700) and adddisplay=swapto your Google Fonts URL to prevent render-blocking.
Frequently Asked Questions (FAQ)
Can I use any font library, or only Google Fonts?
You can use any web font library that provides a CSS @import or <link> URL—including Google Fonts, Adobe Fonts (Typekit), Bunny Fonts, and others. The same @import approach applies regardless of the source.
Where do I add the custom CSS in Secure Privacy?
In your Secure Privacy dashboard, go to Design > Cookie Banner > Custom CSS. Paste your @import rule and font-family declarations there. See the full guide: How to Add Custom CSS for Improved Design and Branding.
Which CSS class should I target for the banner heading?
Use .sp-banner-heading to target the main heading of the Secure Privacy banner. For other elements, use your browser's Inspect tool to identify the correct Secure Privacy class names applied to each component.
Will adding a custom font slow down my website?
It can, if you load too many font weights or styles. To minimize impact, import only the weights you need and include display=swap in your Google Fonts URL to prevent the font from blocking page rendering.