Under GDPR, CCPA, and similar privacy laws, every website that drops cookies or tracks visitors must display a cookie consent banner — and collect proof of that consent. Failing to do so can mean hefty fines and damaged user trust.
Many site owners try to solve this with free WordPress plugins or hand-coded banners, only to discover they expire, break on updates, lack an audit trail, or don't cover regulations beyond GDPR. A proper consent management platform (CMP) handles all of that automatically.
Secure Privacy is a fully automated CMP that scans your site for cookies, generates a compliant consent banner, and keeps your records up to date as laws change — with no ongoing manual work. The single lightweight script you'll install in this guide is all it takes to activate everything.
By the end of this article you will have:
Located your unique Secure Privacy installation script
Added it to your website — manually, via your CMS, or through a developer
Verified the script is live and working correctly
Who Is This Guide For?
This article is for anyone who needs to add GDPR or CCPA cookie consent to their website using Secure Privacy, including:
Website owners and marketers who want to self-install without coding knowledge
Developers who have been asked to add the consent script on behalf of a client
Agencies managing multiple client domains from a single Secure Privacy dashboard
Prerequisites
An active Secure Privacy account — start a free trial if you don't have one yet
The domain you want to protect must already be added inside your Secure Privacy dashboard
Ability to edit the
<head>section of your website (or access to a developer who can)
Installing Your Secure Privacy Script: Step-by-Step
Step 1 — Find Your Cookie Consent Installation Script
Each domain in Secure Privacy gets its own unique script. Here is how to locate yours:
Log in to your Secure Privacy account.
Navigate to the "Domains" section in the main menu.
Locate or search for the domain you want to add cookie consent to.
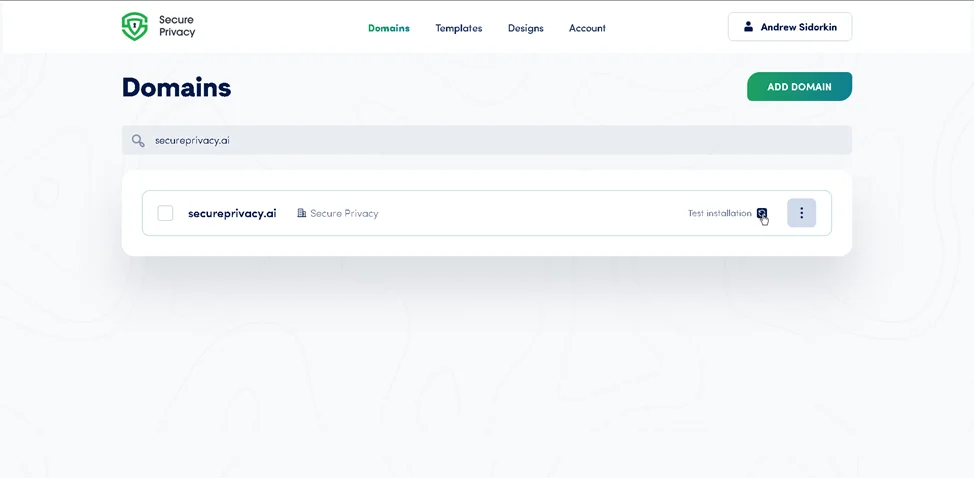
Select the domain you want to install the cookie consent script on.
Click on the domain name to open its settings.
Select the "Installation" tab from the left-side menu.
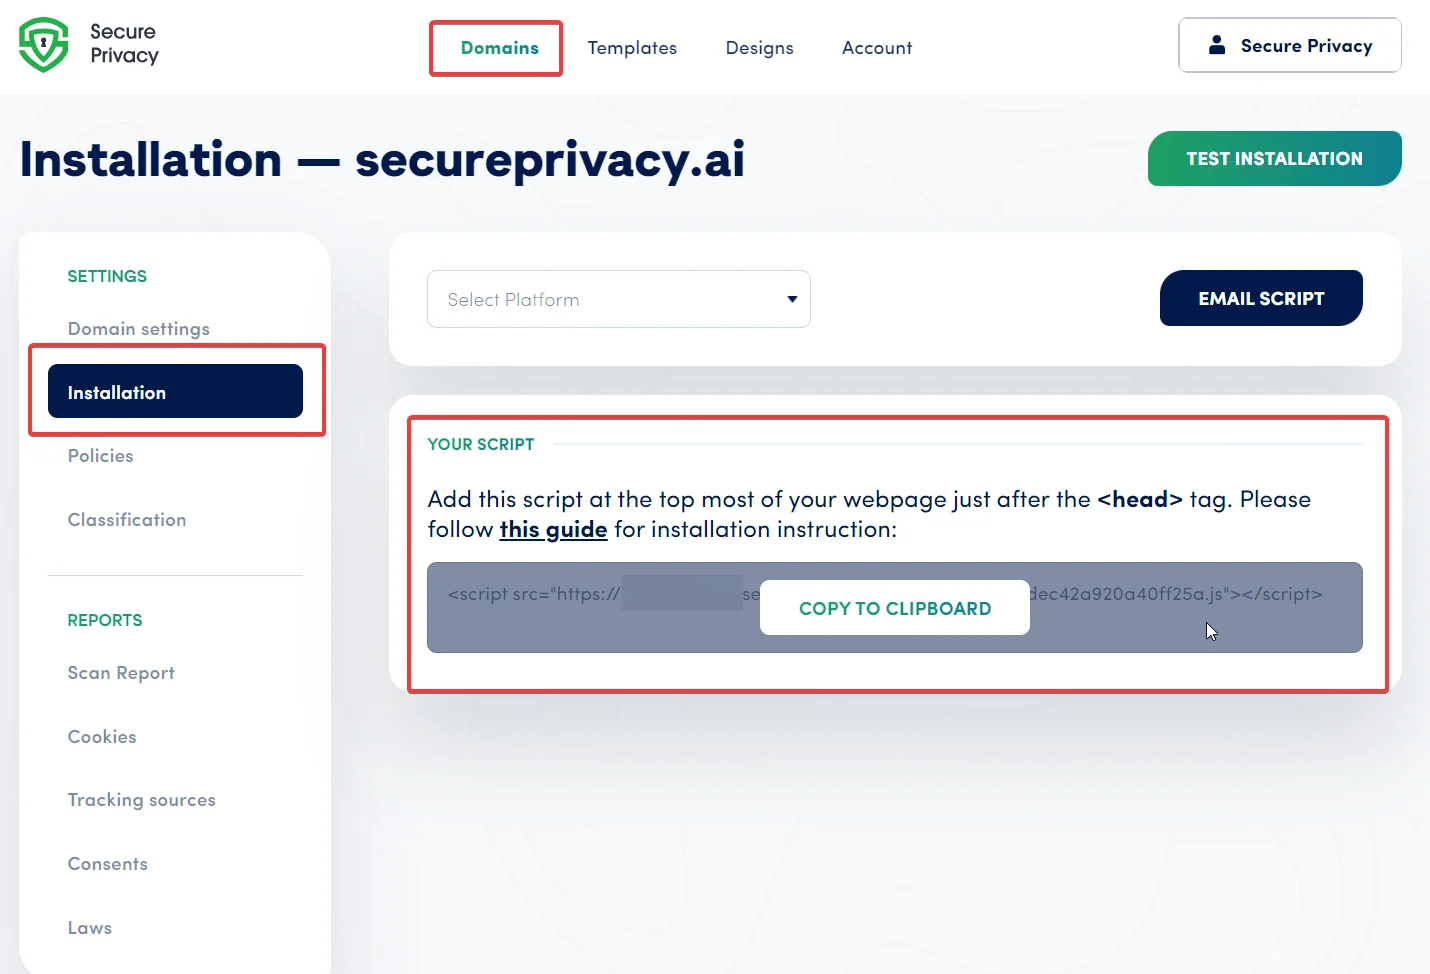
Open the Installation tab to access your unique cookie consent script.
Copy the installation script code displayed on the page.
Paste the script into your website's
<head>section, placing it immediately after the opening<head>tag for optimal performance and consent capture.
If you are not comfortable editing HTML directly, skip to Step 2a (CMS-specific guide) or Step 2b (email your developer).
Step 2a — Use a Platform-Specific CMS Installation Guide
If your website runs on a popular CMS or tag management platform, Secure Privacy provides dedicated cookie consent installation guides for each. Supported platforms include:
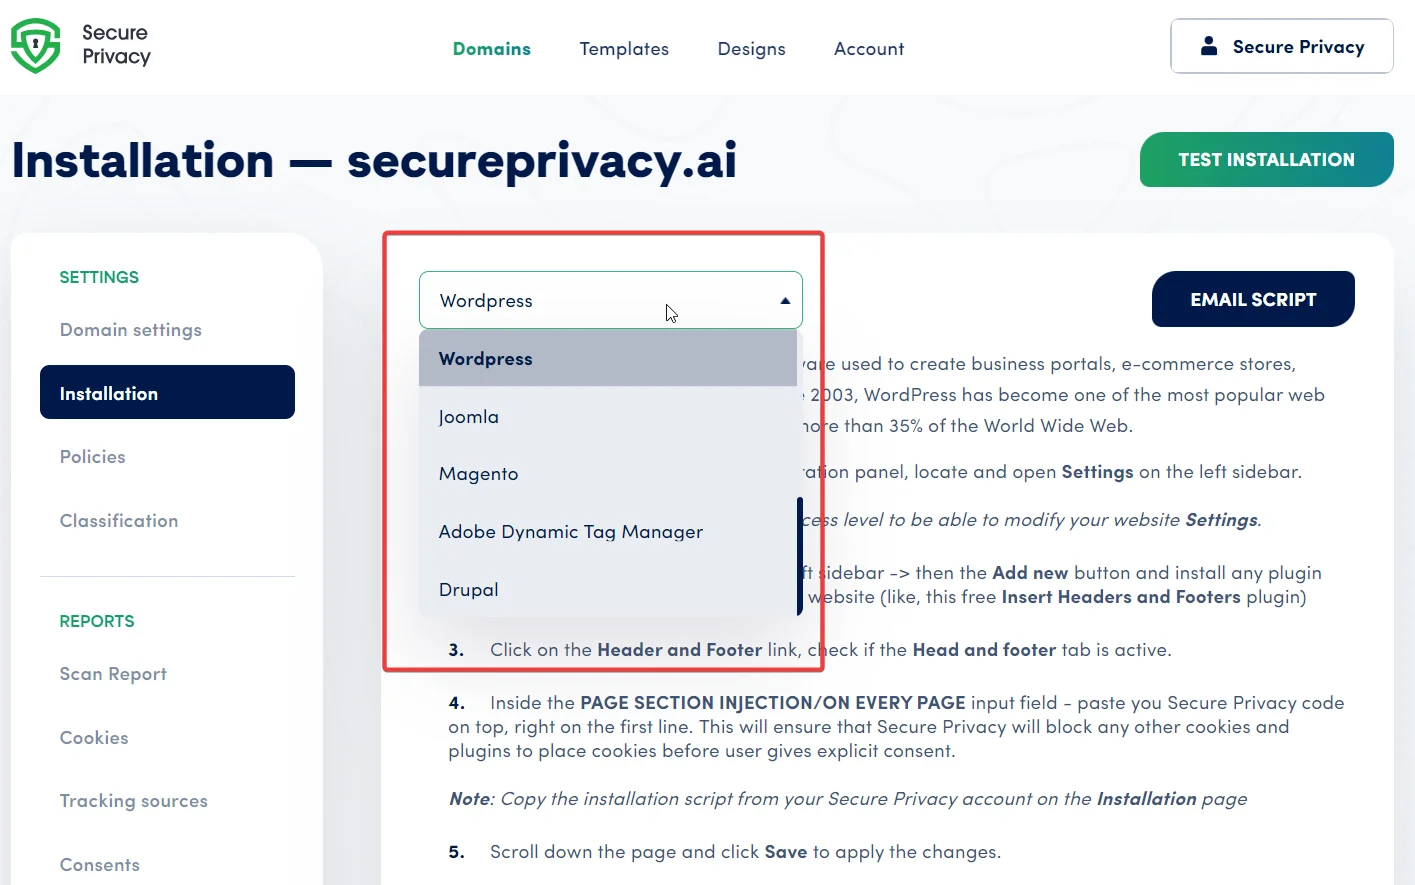
Select your CMS from the dropdown to access a tailored installation guide.
WordPress
Shopify
Squarespace
HubSpot
Weebly
Joomla
Magento
Drupal
Google Tag Manager
Adobe Tag Manager
Select your CMS or platform from the dropdown menu in the Installation tab to access step-by-step instructions tailored to your specific setup.
Step 2b — Email the Cookie Consent Script to Your Developer
If you prefer to have a developer handle the installation, you can send the script directly from your Secure Privacy dashboard — no copy-pasting required:
Log in and click on the relevant domain name.
In the "Installation" tab, click the "Email Script" button.
Enter your developer's email address and click "Share Script" to send the installation code.
Ask your developer to place the script immediately after the opening
<head>tag on every page of your website for full cookie consent coverage.
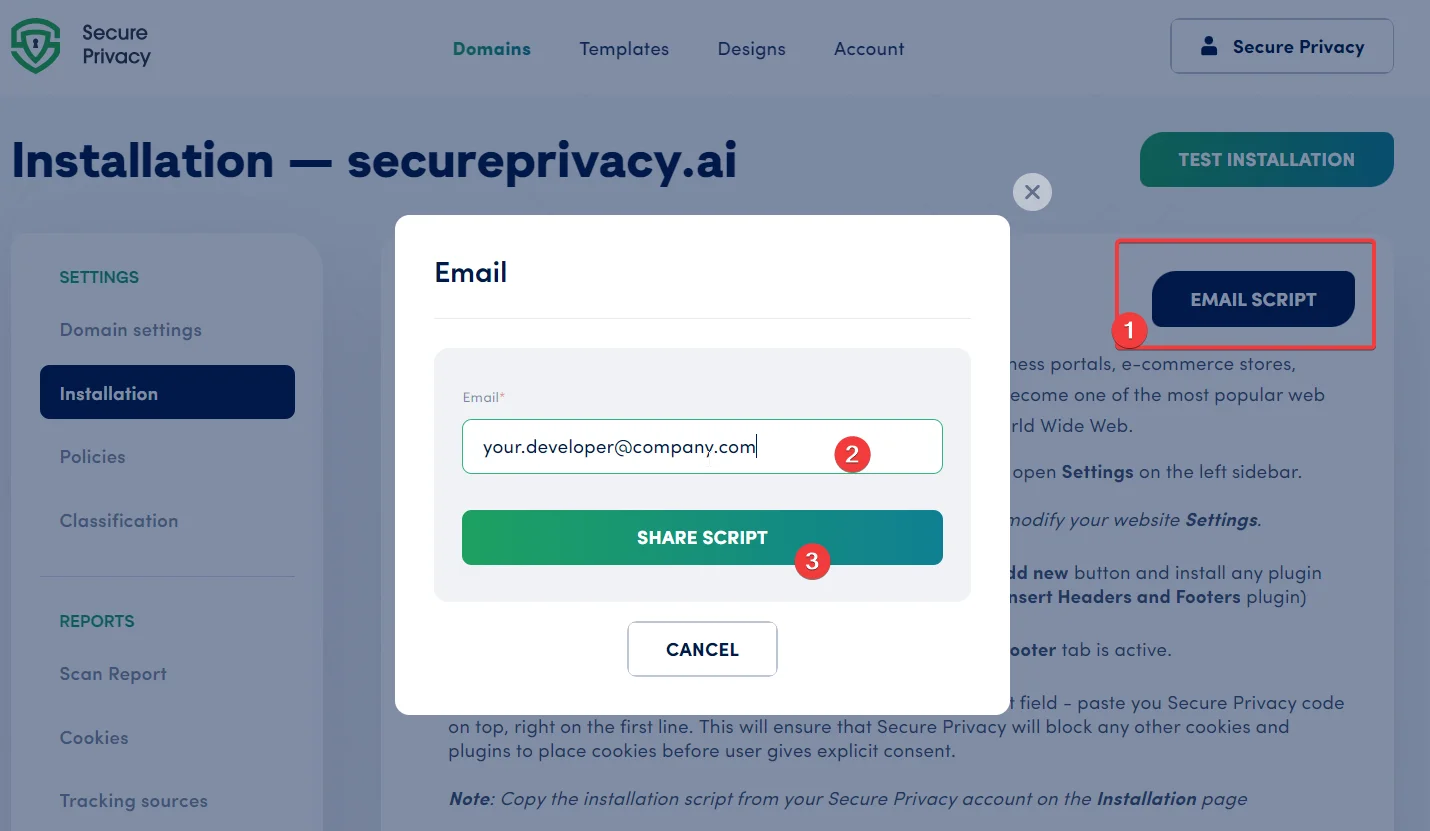
Share the script with a developer in one click from the Installation tab.
Step 3 — Verify Your Cookie Consent Script Is Working
Once the script has been added to your website, confirm it is installed correctly before going live:
Return to the "Installation" tab for your domain in the Secure Privacy dashboard.
Click the "Test Installation" button.
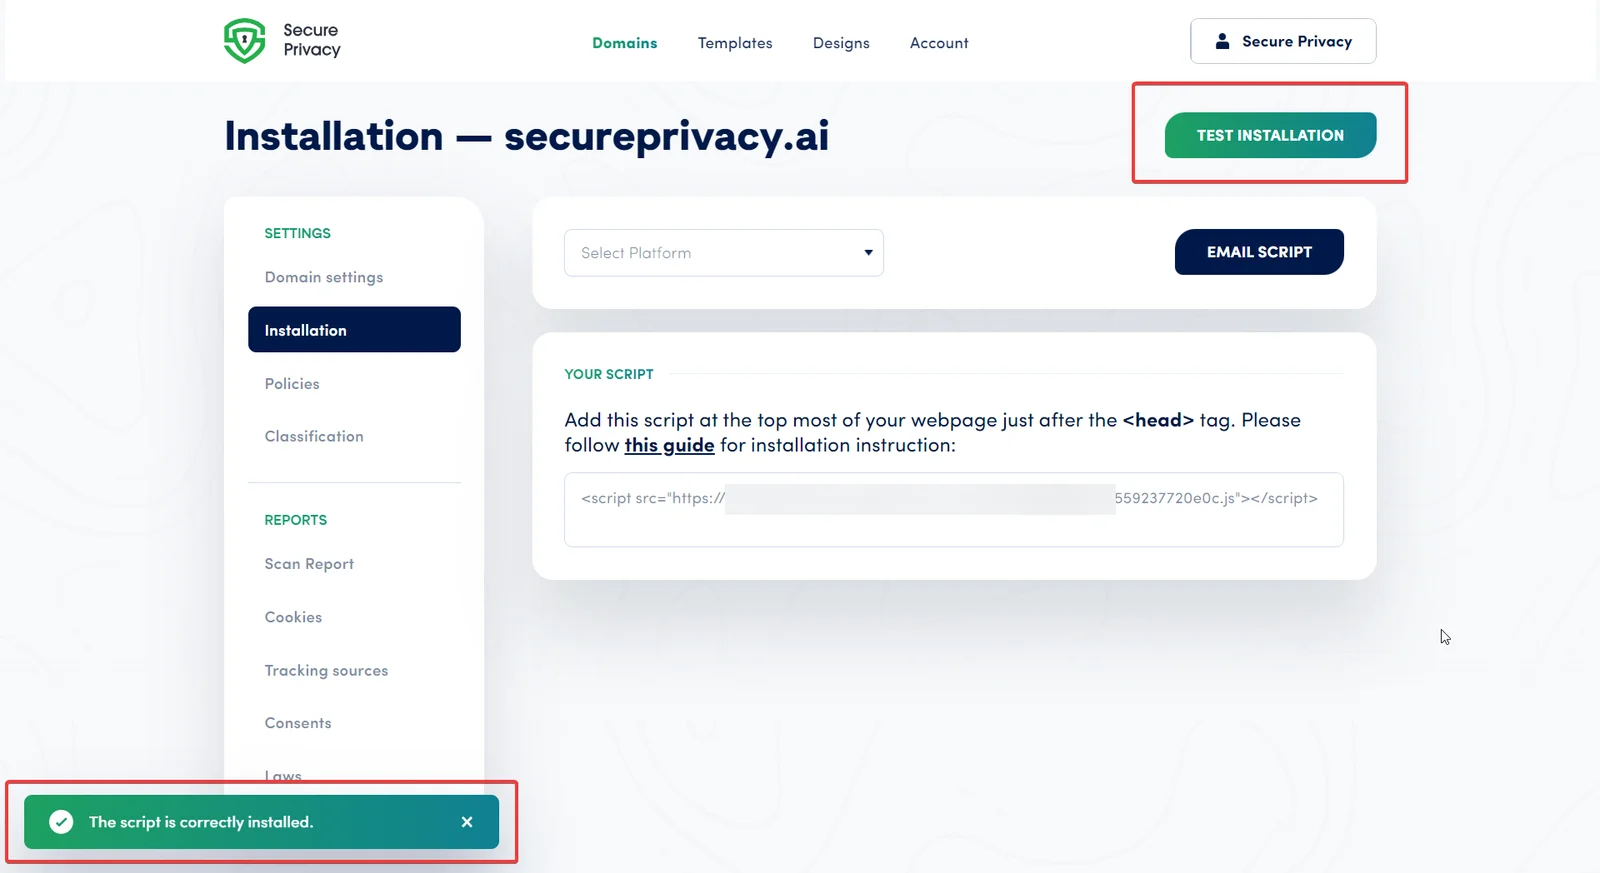
Use the Test Installation button to confirm your cookie consent script is live.
The system will automatically verify whether the script is correctly installed:
Success: You will see a confirmation message confirming the cookie consent script is correctly installed and active.
Error: You will receive a notification describing the issue. Review your installation to ensure the correct script is placed in the right location for your domain.
Troubleshooting: Script Not Detected?
If the Test Installation check returns an error, run through this quick checklist:
Wrong domain selected: Confirm the script you copied belongs to the exact domain (including subdomain) you installed it on.
Script not in
<head>: The script must be placed inside the<head>element, not in<body>or a footer.Caching: If your site uses a caching plugin or CDN, clear the cache and re-run the test.
Tag manager firing rule: If you installed via Google Tag Manager or Adobe Tag Manager, verify the tag is set to fire on All Pages.
Script blocked: Check that no Content Security Policy (CSP) header is blocking the Secure Privacy script domain.
If the problem persists, contact the Secure Privacy support team at [email protected] with a screenshot of the error message and your domain URL.
What Happens After Installation?
With the script live, Secure Privacy begins automatically scanning your site for cookies and trackers. Within a short time you will see:
A cookie consent banner displayed to your visitors, styled to match your branding
An automatically generated cookie policy page linked from your banner
Consent records stored in your dashboard for audit and compliance purposes
Ongoing rescanning as your site changes, keeping your cookie disclosure up to date
Frequently Asked Questions
Do I really need a cookie consent banner on my website?
Yes, in most cases. GDPR (EU/EEA), UK GDPR, CCPA (California), and many other privacy laws require websites to inform users about cookies and, for non-essential cookies, obtain their consent before setting them. Failing to comply can result in significant fines and reputational damage. A consent management platform like Secure Privacy automates this process for you.
Where exactly do I place the Secure Privacy cookie consent script?
The script must be placed immediately after the opening <head> tag on every page of your website. Placing it early in <head> ensures the consent banner loads before any tracking scripts fire, which is a core requirement for GDPR compliance.
Can I install Secure Privacy without touching my website's code?
Yes. You can install the Secure Privacy cookie consent script through Google Tag Manager or Adobe Tag Manager without editing your site's HTML directly. Alternatively, you can use the "Email Script" feature in your dashboard to send the script straight to your developer.
Does Secure Privacy work with WordPress, Shopify, and other CMS platforms?
Yes. Secure Privacy offers dedicated cookie consent installation guides for WordPress, Shopify, Squarespace, HubSpot, Joomla, Magento, Drupal, Weebly, Google Tag Manager, and Adobe Tag Manager. Select your platform from the dropdown in the Installation tab of your dashboard for tailored instructions.
How do I check if my Secure Privacy script is installed correctly?
After adding the script to your site, go to the Installation tab for your domain in your Secure Privacy dashboard and click "Test Installation." The system will automatically check whether the script is live and report success or provide details about any issues found.