
How to Add a Cookie Preference Center Widget (Button or Hyperlink) to Your Website
Regulations like GDPR and the ePrivacy Directive generally require that withdrawing consent be just as easy as giving it — so a cookie banner that only appears once, on the first visit, isn't enough. If your site has no ongoing way for visitors to reopen their cookie preferences, you're likely creating compliance gaps and fielding support requests you shouldn't have to.
Many teams try to fix this by hand-coding a "Cookie Settings" link and wiring it up to their consent tool's API themselves — a solution that's fragile, breaks with the next site redesign, and needs a developer every time it does. Secure Privacy's Button and Hyperlink widgets solve it with a single embeddable snippet you can drop anywhere on your site — footer, header, or privacy policy page — to reopen the Preference Center on click, with no custom API work and no ongoing maintenance.
By the end of this guide, you'll have a working "Privacy Settings" (or "Cookie Settings") link or button live on your site, giving visitors an always-available way to manage their consent.
Compliance Tip
A visible, always-available "Manage Cookies" link — like the one this widget creates — is one of the simplest ways to meet consent-withdrawal requirements under GDPR-style regulations.
Who Is This Guide For?
This guide is for anyone adding a "Manage Cookies" or "Privacy Settings" link to a live website using Secure Privacy, including:
Website admins and developers implementing or customizing the Secure Privacy Preference Center
Marketing and compliance teams who need a reliable, no-code way to expose consent settings
Agencies managing Secure Privacy across multiple client websites
Prerequisites
Before you start, make sure you have:
An active Secure Privacy account with a Preference Center already configured
Admin or editor access to Design > Widget in the Secure Privacy platform
Access to edit your website's HTML, theme files, or CMS template (for example, your footer or header)
How to Add the Button or Hyperlink Widget
Button and Hyperlink widgets are built to be placed manually anywhere on your website. Both use the exact same embed snippet and open the same Preference Center modal — the only difference is how they're styled.
Step 1 — Choose Button or Hyperlink as Your Widget Type
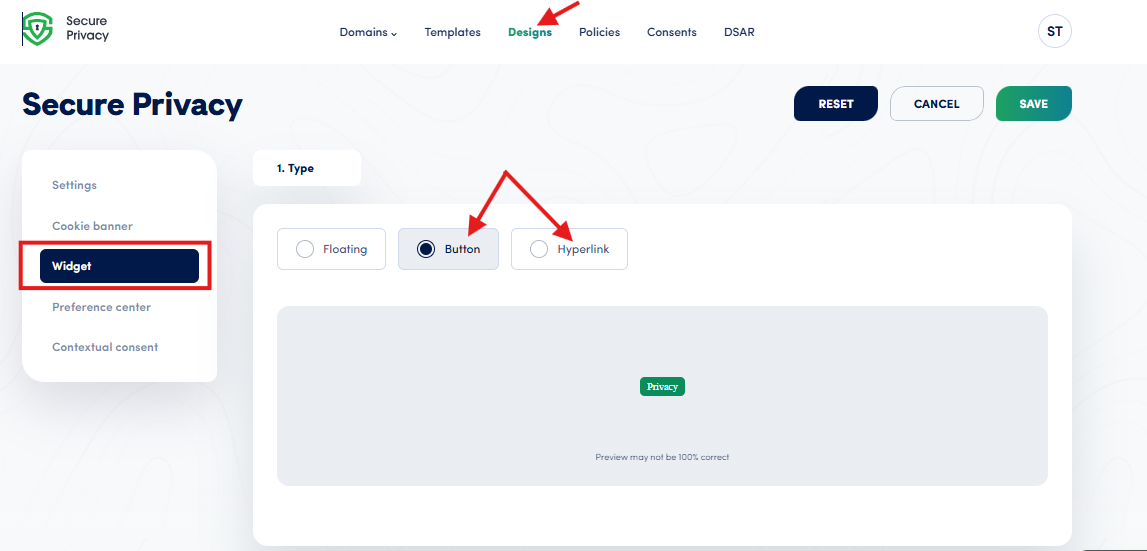
In the Secure Privacy platform, go to Design > Widget and select either Button (a styled call-to-action) or Hyperlink (a plain text link), depending on how you want it to look on the page.
Step 2 — Embed the Widget Code Snippet
Copy the snippet below into your site's HTML at the exact spot where you want the widget to appear:
<span id="sp-tb-embed-widget" onclick="window.parent.sp.openPreferenceCenter();"></span>Step 3 — Confirm the Preference Center Opens on Click
Save your changes, reload the page, and click the new widget. It should open the Preference Center modal immediately, letting visitors review and update their cookie consent choices.
Example: Adding a "Privacy Settings" Link to Your Footer
The most common placement for this widget is the website footer, next to links like "Privacy Policy" or "Terms of Service." Here's how:
Step 1 — Set the Widget Type to Hyperlink
In the platform, set the widget type to Hyperlink so it renders as a plain text link styled to match the rest of your footer.
Step 2 — Paste the Snippet Into Your Footer Template
Paste the embed code from Step 2 above into your website's footer template, at the exact position where you want the "Privacy Settings" link to appear.
Once live, the link renders as clickable text in your footer. When a visitor clicks it, the Preference Center opens instantly — giving them full control over their cookie consent choices from any page on your site.
What Happens After You Add the Widget
Once the widget is live, clicking it opens the Preference Center modal directly on the page — no redirect, no reload. From there, visitors can:
Review which cookie categories are currently active for them
Turn individual categories on or off
Save updated choices, which sync back to Secure Privacy and, if configured, to Google Consent Mode v2
Because the widget always calls the same openPreferenceCenter() function, it stays in sync with any Preference Center changes you make later in the platform — you won't need to touch the embed code again.
Troubleshooting
The widget doesn't open the Preference Center
Confirm the snippet is present in your page's rendered HTML (not just the CMS editor) and that id="sp-tb-embed-widget" isn't duplicated elsewhere on the page — duplicate IDs can stop the click handler from firing.
Nothing happens, and the browser console shows an error
This usually means the Secure Privacy script hasn't loaded on that page yet. Check that your main Secure Privacy installation snippet is present sitewide, and that no tag manager trigger or Content Security Policy (CSP) rule is blocking it.
Frequently Asked Questions
Do I need a "Manage Cookies" link on my website?
Under regulations like GDPR and the ePrivacy Directive, consent generally needs to be as easy to withdraw as it is to give. An always-available link or button that reopens your Preference Center — like Secure Privacy's Button and Hyperlink widgets — is a common way to meet that requirement.
What's the difference between the Button and Hyperlink widget types?
Both use the exact same embed snippet and open the same Preference Center modal. Button renders as a styled call-to-action button, while Hyperlink renders as plain, inline text — pick whichever matches the surrounding design, such as your footer links.
Where should I place the Preference Center widget?
Anywhere visitors would expect to find privacy controls — most commonly the footer, alongside your Privacy Policy and Terms of Service links. It also works well in a header, account settings page, or dedicated privacy page.
Can I use the same widget snippet on multiple pages?
Yes. Embed the snippet in a shared template — like your site's global footer — and it renders and functions identically on every page that uses that template.