If you run more than one website, you already know the problem: a visitor lands on your main domain, accepts the cookie banner, clicks through to your regional site or booking portal — and the banner appears again. And again. Every domain triggers its own consent prompt, frustrating users and making your brand feel fragmented rather than seamless.
Many teams try to work around this with custom code, shared subdomains, or third-party scripts stitched together — solutions that are brittle, hard to audit, and rarely satisfy a GDPR compliance review. Managing cookie consent across multiple domains shouldn't require a developer sprint every time you add a new site.
Secure Privacy's cross-domain consent feature is built for exactly this situation. By grouping your related domains into a single shared consent configuration, users grant cookie consent once — and that consent automatically carries across every site in the group. No repeated banners, no compliance gaps, no custom plumbing required.
By the end of this guide, you'll have cross-domain cookie consent fully configured in your Secure Privacy account, with all your related domains sharing a single GDPR-compliant consent record.
Who Is This Guide For?
This guide is intended for anyone responsible for cookie consent and privacy compliance across multiple websites:
Website Administrators managing several related domains
Privacy Compliance Officers overseeing GDPR and ePrivacy obligations
Web Developers and IT Teams integrating consent management solutions
Digital Marketers running multi-domain brand or campaign sites
Prerequisites
Before configuring cross-domain consent, make sure you have:
An active Secure Privacy account with the relevant subscription plan
All target domains fully onboarded in your domain management settings
The Secure Privacy script installed on every domain you plan to link
Confirmed — ideally with your legal or privacy team — that all linked domains share a related purpose and a valid legal basis for sharing consent data
Understanding Cross-Domain Cookie Consent
What Is Cross-Domain Consent?
Cross-domain consent allows users to provide cookie consent once, with that consent automatically applying across multiple related domains or subdomains. Rather than storing a separate consent cookie on each domain, a single shared consent record covers every site in your configured group. This prevents visitors from being shown a cookie banner on every site they navigate to — significantly improving the experience for users moving between related websites, such as a brand's main site, regional subdomains, or linked service portals.
When Should You Use Cross-Domain Consent?
Cross-domain consent is appropriate when the domains involved share the same purpose or provide related content and functionality. Always ensure that data processing across the linked domains aligns with applicable privacy regulations — particularly GDPR — and that there is a valid legal basis for sharing consent. Avoid enabling cross-domain consent for domains that serve distinctly different purposes, as this can create compliance risks.
Example Use Case
An online hotel booking platform operating across multiple domains — for example, one for location selection, one for hotel details, and one for the booking process — can use cross-domain consent so that users grant cookie consent once and are not prompted again as they move through the booking journey.
How to Enable Cross-Domain Consent in Secure Privacy
Follow these four steps to create a shared cookie consent group and synchronize consent across all your related domains.
Step 1 — Install the Secure Privacy Script on All Domains
Before configuring cross-domain consent, ensure the Secure Privacy script is correctly installed on all domains you intend to include in the consent group. This script is responsible for managing and synchronizing cookie consent across your websites. If the script is missing from even one domain, consent will not sync correctly to that site.
Step 2 — Access the Cross-Domain Consent Settings Page
Log in to your Secure Privacy account. Click Account and navigate to the Cross Domain Consent tab. This is where you create and manage your cross-domain consent groups.
The Cross Domain Consent tab inside Secure Privacy Account settings
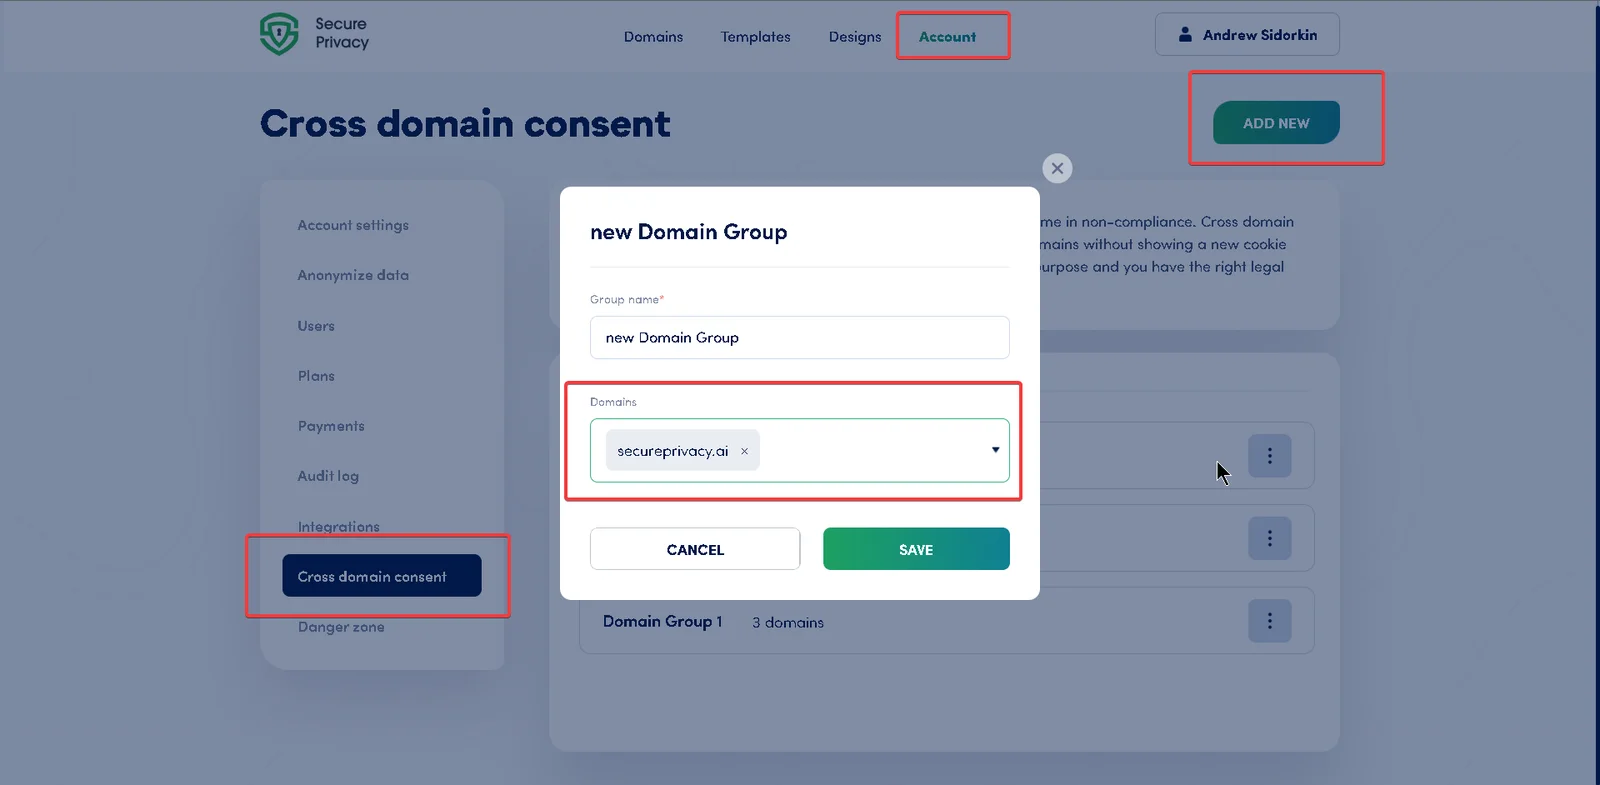
Step 3 — Create a New Cross-Domain Consent Group
Click the ADD NEW button to create a new consent group. Enter a descriptive group name in the popup window. Open the Domains dropdown list and use the search bar to find and select all domains you want to link within this cross-domain consent group.
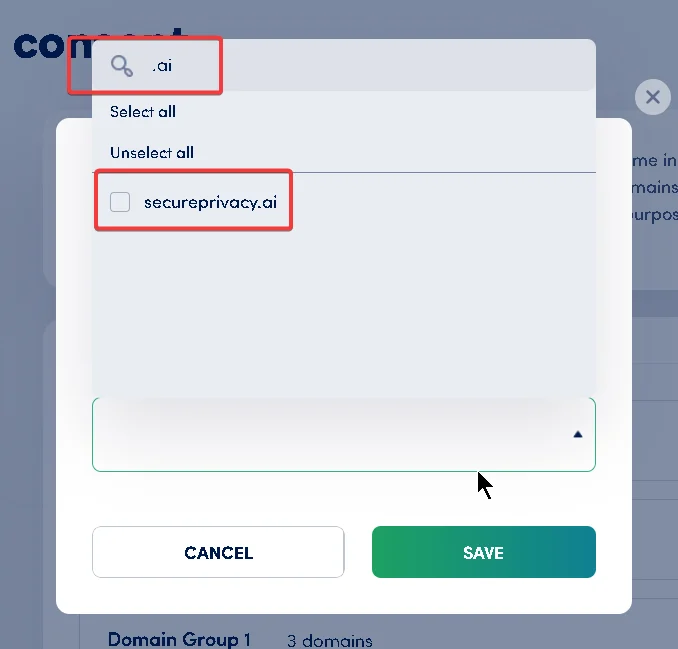
Creating a new cross-domain consent group and selecting domains
Step 4 — Save and Apply Your Cross-Domain Consent Configuration
Click Save to confirm and activate your new consent group settings. Cross-domain cookie consent will now be enabled for all selected domains within the group. Users will only need to provide consent once — that single consent record will apply seamlessly across all linked sites.
Important GDPR Compliance Notice
Enabling cross-domain consent requires careful legal consideration. Using this feature across domains that differ significantly in purpose or data processing activities can result in non-compliance with GDPR and other applicable privacy regulations. Only enable cross-domain consent for domains that share a related purpose and where a proper legal basis exists for sharing consent data. Cross-domain consent works by sharing a single consent cookie across all linked domains — which reduces repetitive banners but must be implemented responsibly. Consult your legal or privacy team if you are unsure whether your domain configuration meets regulatory requirements.
Troubleshooting Cross-Domain Consent
Common cross-domain consent issues and recommended fixes | |
Issue | Recommended Fix |
|---|---|
Consent not syncing across domains | Verify the Secure Privacy script is correctly installed on all domains. Ensure all relevant domains are added to the same consent group. |
Domains flagged for non-compliance | Confirm that all linked domains serve the same or closely related purpose and that shared data processing complies with applicable privacy laws. |
Unable to find a domain in the selection list | Confirm the domain has been added in domain management and that onboarding is fully complete before attempting to add it to a consent group. |
Frequently Asked Questions
Why do my visitors keep seeing a cookie consent banner on every domain?
By default, cookie consent is stored per domain, so each site a user visits triggers its own banner. Cross-domain consent solves this by sharing a single consent record across all your linked domains, so users only see the banner once regardless of how many sites they navigate between.
Is cross-domain cookie consent GDPR compliant?
Cross-domain consent can be fully GDPR compliant when implemented correctly. The domains must share a related purpose and a valid legal basis for sharing consent data. Linking unrelated domains or purposes can create compliance risks — consult your legal or privacy team if in doubt.
Can cross-domain consent work for subdomains as well as separate domains?
Yes. Secure Privacy's cross-domain consent feature works for both separate top-level domains and related subdomains. Simply add all relevant domains or subdomains to the same consent group in your account settings.
What should I do if consent is not syncing across my domains?
First, verify that the Secure Privacy script is correctly installed on every domain in the group. Then confirm all domains have been added to the same consent group in your account's Cross Domain Consent settings. If a domain is missing from the group or the script is absent, consent will not sync to that site.
Does a domain need to be fully set up before I can add it to a consent group?
Yes. Any domain you want to include in a cross-domain consent group must first be fully onboarded in your Secure Privacy domain management settings. Domains that are still mid-onboarding will not appear in the domain selection list.