Summary: Google Consent Mode (GCM) is a Google API that lets website owners integrate user consent choices directly into Google tag behavior—ensuring privacy compliance via tools like Google Tag Manager (GTM) or the global site tag. This tutorial covers Advanced Consent Mode setup using the Secure Privacy GTM Community Template, including GCM v2's ad_user_data and ad_personalization parameters.
With Secure Privacy, Google Consent Mode can be implemented in two ways:
Advanced Mode (this tutorial)
Who Is This Guide For?
Website administrators managing consent banners and tag configuration
Developers & technical marketers integrating Google Analytics or Google Ads via GTM
Compliance and privacy professionals ensuring GDPR, CCPA, and Google EU User Consent Policy adherence
Before You Begin: Prerequisites
An active Secure Privacy account with your Domain ID ready
Access to your site's Google Tag Manager container
If you are an existing Secure Privacy user using the GTM-native approach: remove the Secure Privacy script from the
<head>of your website before proceedingNew users do not need to add the Secure Privacy script to the head tag
Why Use Google Consent Mode Advanced Mode?
Advanced Consent Mode gives you granular control over how Google tags behave based on each user's consent decision. For example, if a user declines analytics cookies, only aggregate, cookieless data is sent to Google—helping you balance privacy compliance with website performance measurement. Unlike Basic Mode, Advanced Mode enables conversion modeling and behavioral modeling even for non-consenting users, reducing data gaps in your analytics and advertising reporting.
GCM v2 expands support to five consent types—advertisement, analytics, functional, personalization, and security cookies—plus two new parameters: ad_user_data and ad_personalization.
How Secure Privacy Integrates with Google Consent Mode
Secure Privacy passes user consent choices directly to Google, ensuring your website only collects personal data with explicit user permission and falls back to aggregated, privacy-safe data when consent is declined. This keeps you compliant with GDPR and CCPA while maintaining user trust and advertising performance.
How to Set Up Google Consent Mode Advanced Using Google Tag Manager
Step 0: Set Up Google Tag Manager
Ensure Google Tag Manager is installed on your site before proceeding.
Step 1: Create a New Tag in Google Tag Manager
In your GTM container, navigate to Tags in the left sidebar, then click New.

Navigate to Tags in GTM and click New to create a new tag.
Step 2: Find the Secure Privacy Template in the Community Gallery
Click Tag Configuration, then select "Discover more tag types in the Community Template Gallery." Search for Secure Privacy in the gallery.

Search for "Secure Privacy" in the GTM Community Template Gallery.
Step 3: Add the Secure Privacy CMP Template to Your Workspace
Select the Secure Privacy CMP template from the results, then click Add to Workspace > Add.

Select the Secure Privacy CMP template and add it to your GTM workspace.
Step 4: Configure Your Secure Privacy Domain ID and Tag Settings
Insert your Secure Privacy Domain ID, configure any additional values as needed, and save the tag.
We have a quick giude on how to locate your Domain ID here.

Enter your Secure Privacy Domain ID and configure consent defaults.
Setting a Default Consent State (Recommended)
To configure a Default Consent Setting for each consent category:
Click Add Setting.
Select Granted or Denied from the dropdown for each consent category as required.
Set the Region using ISO 3166-2 codes. Use all if you do not want to geo-target by region.
Click Add to confirm.
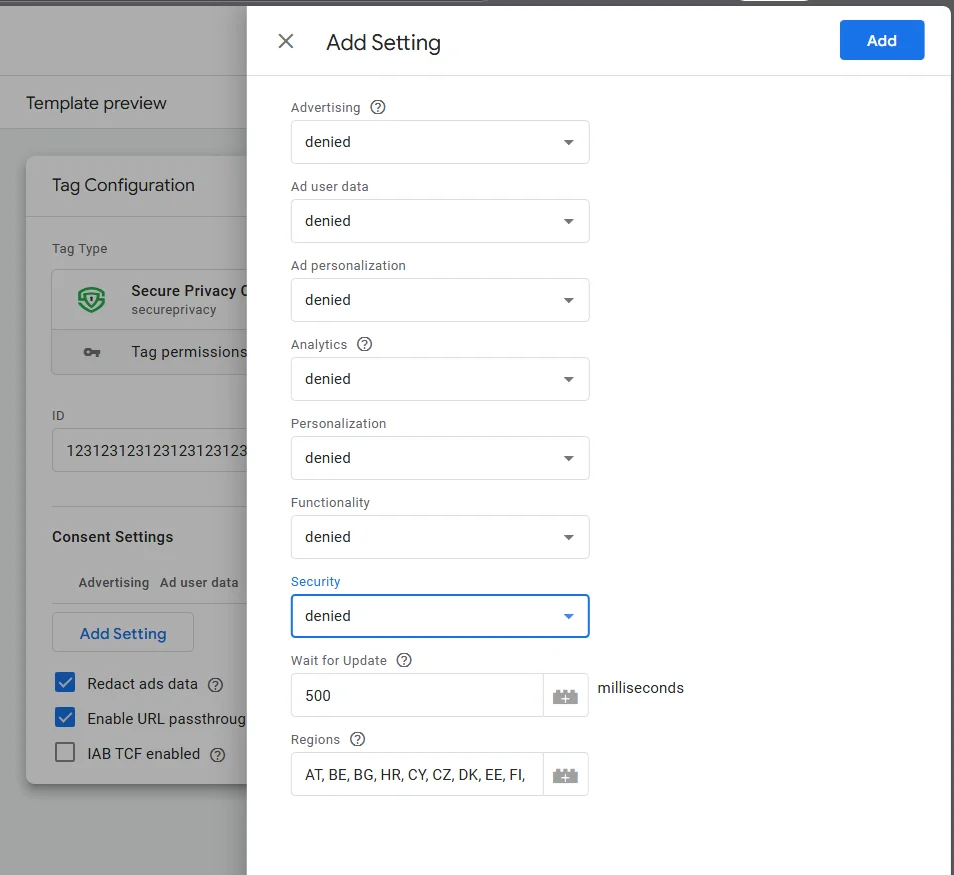
Configure default Granted/Denied states per consent category and target region.
Step 5: Set the Trigger to "Consent Initialization – All Pages"
Under Triggering, select Consent Initialization – All Pages. This ensures the Secure Privacy consent signal fires before any other tags load—critical for correct Advanced Consent Mode behavior.
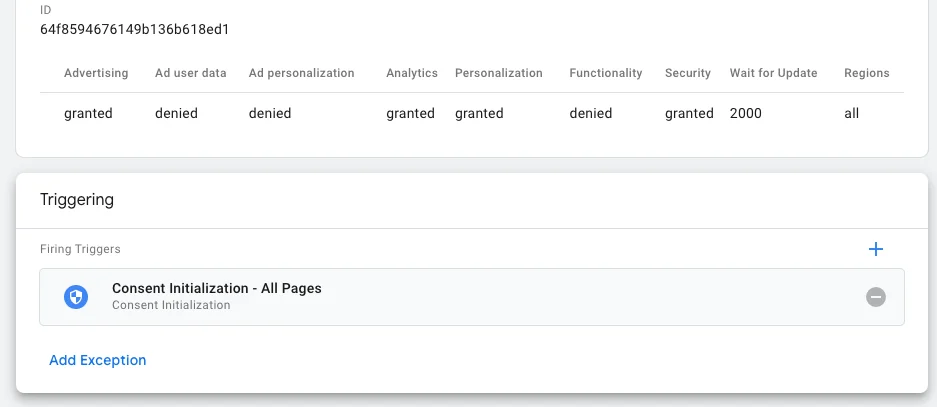
Set the trigger to "Consent Initialization – All Pages" for correct consent signal timing.
Step 6: Save and Publish
Click Save to finalize the tag configuration, then submit and publish your GTM container to make the integration live.
Optional: Blocking Third-Party Cookies in GTM
If your site loads third-party scripts through GTM, you may need to prevent those scripts from setting cookies when users have not granted consent. See: How to Block Cookies with Google Tag Manager.
Common Google Consent Mode Advanced Issues & Fixes
Tag not firing as expected? Double-check the step order in GTM and confirm the trigger is set to Consent Initialization – All Pages—not a standard page view trigger.
Consent choices not being reflected in Google tags? Verify your Secure Privacy Domain ID is entered correctly and that your consent categories are properly mapped in the tag configuration.
Still not working? Check our troubleshooting knowledge base or contact the Secure Privacy support team directly.
Frequently Asked Questions (FAQ)
What is the difference between Basic and Advanced Google Consent Mode?
Basic Consent Mode blocks all Google tags until the user explicitly consents. Advanced Consent Mode loads tags immediately but sends only anonymous "cookieless pings" before consent is granted—enabling conversion and behavioral modeling while maintaining GDPR compliance. See our Basic vs. Advanced Consent Mode comparison guide.
Do I need to remove the Secure Privacy script from my site's <head> when using GTM?
Yes—if you are an existing Secure Privacy user switching to the GTM-native approach, remove the Secure Privacy script from your site's <head> to avoid conflicts. New users can skip this step.
What trigger should I use in GTM for Google Consent Mode?
Always use Consent Initialization – All Pages as the trigger. This guarantees the consent signal is sent before any other Google tags fire, which is required for Advanced Consent Mode to work correctly.
What are the new GCM v2 parameters and why do they matter?
GCM v2 adds ad_user_data and ad_personalization parameters, which give Google specific signals about whether a user has consented to their data being used for advertising personalization and audience targeting. These are required to maintain full ad functionality under Google's EU User Consent Policy.
Is Secure Privacy a Google-certified Consent Management Platform?
Yes. Secure Privacy is a Google-certified CMP, meeting Google's technical and policy standards for consent signal integration with Google tags, Analytics, and Ads.
Conclusion
By implementing Google Consent Mode Advanced with Secure Privacy's GTM Community Template, your website respects user consent decisions while remaining compliant with GDPR, CCPA, and Google's EU User Consent Policy. Advanced Mode ensures you retain the best possible analytics and advertising data through modeling—even when users decline consent.
Need Further Assistance?
Contact the Secure Privacy support team at [email protected].
For urgent matters related to Google Consent Mode, email [email protected] — we aim to respond within one business day.
For policy questions directed to Google, contact the Google EU User Consent Policy team at [email protected].